The service desk with bots using Amazon Lex and Amazon Connect (Part 2)
Hopefully you’ve had the chance to follow along in parts 1 where we set up our Lex chatbot to take and validate input.
In this blog, we’ll interface with our Active Directory environment to perform the password reset function. To do this, we need to create a Lambda function that will be used as the logic to fulfil the user’s intent. The Lambda function will be packaged with the python LDAP library to modify the AD password attribute for the user. Below are the components that need to be configured.
Active Directory Service Account
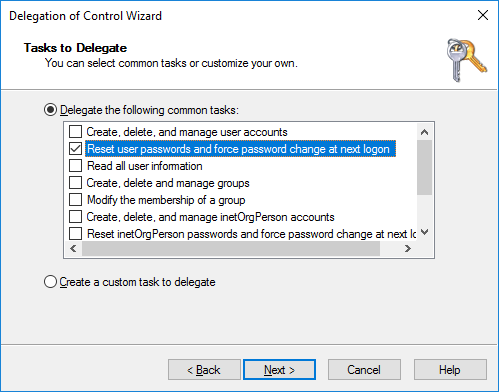
To begin, we need to start by creating a service account in Active Directory that has permissions to modify the password attribute for all users. Our Lambda function will then use this service account to perform password resets. To do this, create a service account in your Active Directory domain and perform the following to delegate the required permissions:
- Open Active Directory Users and Computers.
- Right click the OU or container that contains organisational users and click Delegate Control
- Click Next on the Welcome Wizard.
- Click Add and enter the service account that will be granted the reset password permission.
- Click OK once you’ve made your selection, followed by Next.
- Ensure that Delegate the following common tasks is enabled, and select Reset user passwords and force password change at next logon.
- Click Next, and Finish
KMS Key for the AD Service Account
Our Lambda function will need to use the credentials for the service account to perform password resets. We want to avoid storing credentials within our Lambda function, so we’ll store the password as an encrypted Lambda variable and allow our Lambda function to decrypt it using Amazon’s Key Management Service (KMS). To create the KMS encryption key, perform the following steps:
- In the Amazon Console, navigate to IAM
- Select Encryption Keys, then Create key
- Provide an Alias (e.g. resetpw) then select Next
- Select Next Step for all subsequent steps then Finish on step 5 to create the key.
IAM Role for the Lambda Function
Because our Lambda function will need access to several AWS services such as SNS to notify the user of their new password and KMS to decrypt the service account password, we need to provide our function with an IAM role that has the relevant permissions. To do this, perform the following steps:
- In the Amazon Console, navigate to IAM
- Select Policies then Create policy
- Switch to the JSON editor, then copy and paste the following policy, replacing the KMS resource with the KMS ARN created above
{ "Version": "2012-10-17", "Statement": [ { "Effect": "Allow", "Action": "sns:Publish", "Resource": "*" }, { "Effect": "Allow", "Action": "kms:Decrypt", "Resource": "<KMS ARN>" } ] } - Provide a name for the policy (e.g. resetpw), then select Create policy
- After the policy has been created, select Roles, then Create Role
- For the AWS Service, select Lambda, then click Next:Permissions
- Search for and select the policy you created in step 5, as well as the AWSLambdaVPCAccessExecutionRole and AWSLambdaBasicExecutionRole policies then click Next: Review
- Provide a name for the role (e.g. resetpw) then click Create role
Network Configuration for the Lambda Function
To access our Active Directory environment, the Lambda function will need to run within a VPC or a peered VPC that hosts an Active Directory domain controller. Additionally, we need the function to access the internet to be able to access the KMS and SNS services. Lambda functions provisioned in a VPC are assigned an Elastic network Interface with a private IP address from the subnet it’s deployed in. Because the ENI doesn’t have a public IP address, it cannot simply leverage an internet gateway attached to the VPC for internet connectivity and as a result, must have traffic routed through a NAT Gateway similar to the diagram below.

Password Reset Lambda Function
Now that we’ve performed all the preliminary steps, we can start building the Lambda function. Because the Lambda execution environment uses Amazon Linux, I prefer to build my Lambda deployment package on a local Amazon Linux docker container to ensure library compatibility. Alternatively, you could deploy a small Amazon Linux EC2 instance for this purpose, which can assist with troubleshooting if it’s deployed in the same VPC as your AD environment. Okay, so let’s get started on building the lambda function. Log in to your Amazon Linux instance/container, and perform the following:
-
Create a project directory and install python-ldap dependencies, gcc, python-devel and openldap-devel
Mkdir ~/resetpw
sudo yum install python-devel openldap-devel gcc
-
Next, we’re going to download the python-ldap library to the directory we created
Pip install python-ldap -t ~/resetpw
-
In the resetpw directory, create a file called reset_function.py and copy and paste the following script
import ldap
import os
import boto3
import random
import string

from base64 import b64decode

#Variables
url=os.environ['url']
domain_base_dn=os.environ['domain_base_dn']
user=os.environ['user']
ENCRYPTED=os.environ['pw']
pw=boto3.client('kms').decrypt(CiphertextBlob=b64decode(ENCRYPTED))['Plaintext']

def lambda_handler(event, context):
    #Set up LDAP connection
    ldap.set_option(ldap.OPT_X_TLS_REQUIRE_CERT, ldap.OPT_X_TLS_NEVER)
    con = ldap.initialize(url)
    con.set_option(ldap.OPT_REFERRALS, 0)
    con.bind_s(user,pw)
    slotUserID = event["currentIntent"]["slots"]["UserID"]
    results = con.search_ext_s(domain_base_dn,ldap.SCOPE_SUBTREE,"sAMAccountName=" + slotUserID,attrlist=['monthStarted', 'birthDate', 'distinguishedName','telephoneNumber'])
    birthdate = results[0][1]["birthDate"][0]
    monthStarted = results[0][1]["monthStarted"][0]
    phoneNumber = results[0][1]["telephoneNumber"][0]
    slotBirthDate = event["currentIntent"]["slots"]["DOB"]
    slotMonth = event["currentIntent"]["slots"]["MonthStarted"]

    # Reset Password
    if((birthdate == slotBirthDate) and (monthStarted == slotMonth)):
        new_password = ''.join(random.choice(string.letters + string.digits + string.punctuation) for _ in range(10))
        unicode_pass = unicode('\"' + new_password + '\"', 'iso-8859-1')
        password_value = unicode_pass.encode('utf-16-le')
        add_pass = [(ldap.MOD_REPLACE, 'unicodePwd', [password_value])]
        con.modify_s(results[0][1]["distinguishedName"][0],add_pass)
        sns = boto3.client('sns')
        sns.publish(PhoneNumber=phoneNumber, Message='Your new password is ' + new_password )
        endData = {
            "dialogAction": {
                "type": "Close",
                "fulfillmentState": "Fulfilled",
                "message": {
                    "contentType": "PlainText",
                    "content": "Your password has been reset and sent to your mobile."
                }
            }
        }
    else:
        endData = {
            "dialogAction": {
                "type": "Close",
                "fulfillmentState": "Failed",
                "message": {
                    "contentType": "PlainText",
                    "content": "The details you provided are incorrect. Goodbye"
                }
            }
        }
    con.unbind()
    return endData
- Now, we need to create the Lambda deployment package. As the package size is correlated with the speed of Lambda function cold starts, we need to filter out anything that’s not necessary to reduce the package size. The following zip’s the script and LDAP library:
    Cd ~/resetpw
zip -r ~/resetpw.zip . -x "setuptools*/*" "pkg_resources/*" "easy_install*"*
- We need to deploy this package as a Lambda function. I’ve got AWSCLI installed in my Amazon Linux container, so I’m using the following CLI to create the Lambda function. Alternatively, you can download the zip file and manually create the Lambda function in the AWS console using the same parameters specified in the CLI below.
aws lambda create-function --function-name reset_function --region us-east-1 --zip-file fileb://root/resetpw.zip --role resetpw --handler reset_function.lambda_handler --runtime python2.7 --timeout 30 --vpc-config SubnetIds=subnet-a12b3cde,SecurityGroupIds=sg-0ab12c30 --memory-size 128*
-
For the script to run in your environment, a number of Lambda variables need to be set which will be used at runtime. In the AWS Console, navigate to Lambda then click on your newly created Lambda function. In the environment variables section, create the following variables:
- Url – This is the LDAPS URL for your domain controller. Note that it must be LDAP over SSL.
- Domain_base_dn – The base distinguished name used to search for the user
- User – The service account that has permissions to change the user password
- Pw – The password of the service account
-
Finally, we need to encrypt the Pw variable in the Lambda console. Navigate to the Encryption configuration and select Enable helpers for encryption in transit. Select your KMS key for both encryption in transit and at reset, then select the Encrypt button next to the pw variable. This will encrypt and mask the value.
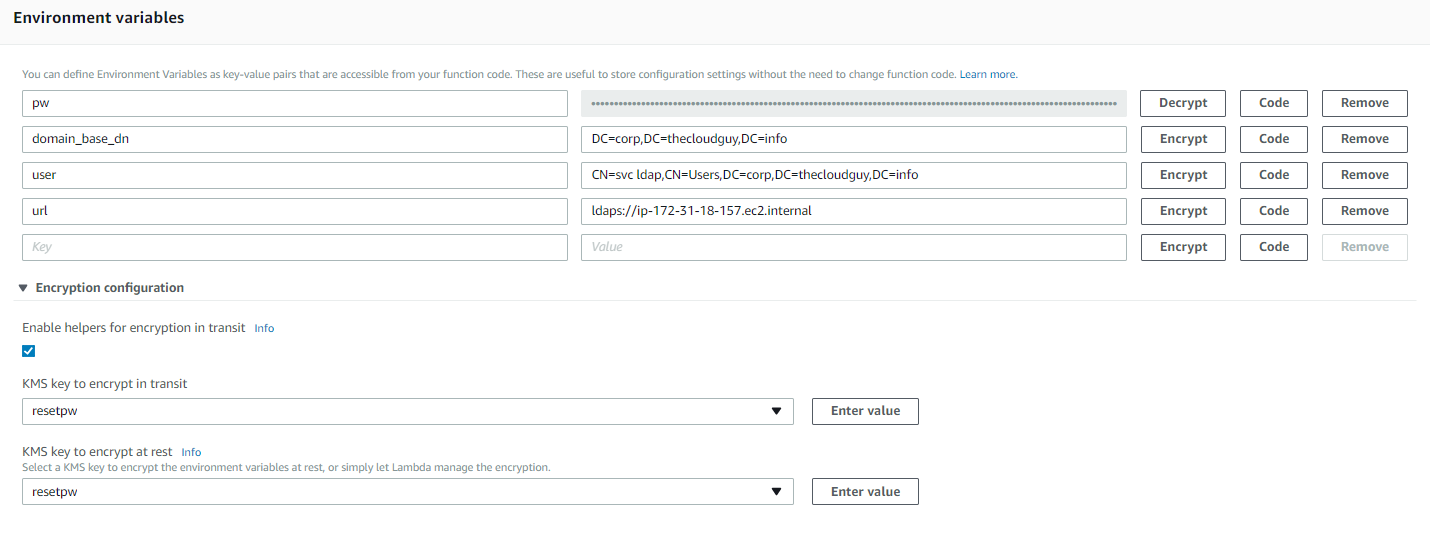
- Hit Save in the top right-hand corner to save the environment variables
That’s it! The Lambda function is now configured. A summary of the Lambda function’s logic is as follows:
- Collect the Lambda environment variables and decrypt the service account password
- Perform a secure AD bind but don’t verify the certificate (I’m using a Self-Signed Cert in my lab)
- Collect the user’s birthday, start month, telephone number, and DN from AD
- Check the user’s verification input
- If the input is correct, reset the password and send it to the user’s telephone number, otherwise exit the function.
Update and test Lex bot fulfillment
The final step is to add the newly created Lambda function to the Lex bot so it’s invoked after input is validated. To do this, perform the following
- In the Amazon Console, navigate to Amazon Lex and select your bot
- Select Fulfillment for your password reset intent, then select AWS Lambda function
- Choose the recently created Lambda function from the drop down box, then select Save Intent
That should be it! You’ll need to build your bot again before testing…
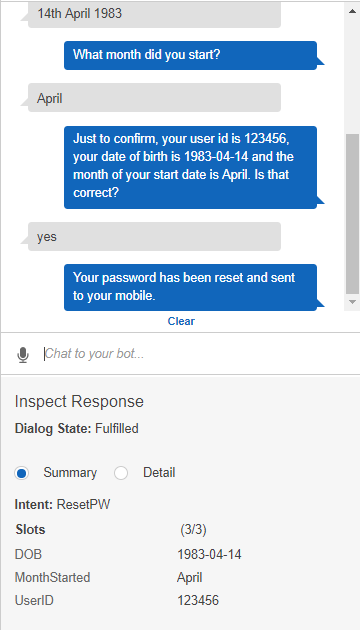
My phone buzzes with a new SMS…
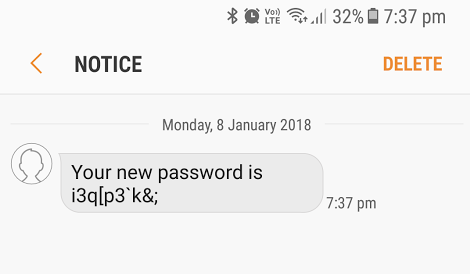
Success! A few final things worth noting:
All Lambda execution logs will be written to CloudWatch logs, so this is the best place to begin troubleshooting if required Modification to the AD password attribute is not possible without a secure bind and will result in an error. The interrogated fields (month started and date of birth) are custom AD attributes in my lab. Password complexity in my lab is relaxed. If you’re using the default password complexity in AD, the randomly generated password in the lambda function may not meet complexity requirements every time.
While we’ve successfully tested this functionality in the AWS console, we want to provide our users with the ability to call and talk with the bot over the phone. Here, we’ll wire up Amazon Connect with our bot to provide this capability.
What is Amazon Connect
Amazon Connect is a Cloud based contact service center that can be set up in minutes to take phone calls and route them to the correct service center agents. Additionally, Connect is able to integrate with Amazon Lex to create a self-service experience, providing a cost effective method for resolving customer queries without having to wait in queue for a human agent. In our case, Lex will be integrated with Amazon Connect to field password reset requests.
Provisioning Amazon Connect
The following steps provision the base Amazon Connect tenant:
- Begin by heading to the AWS Console, then navigate to Amazon Connect and select Add an instance.
- Specify a sub-domain for the access URL which will be used to log into Amazon Connect. Select Next step.
- For now, skip creating an administrator by selecting Skip this, then select Next step.
- For Telephony Options ensure Incoming Calls is selected and Outbound Calls is unselected, then click Next step.
- Accept the default data storage configuration and select Next step.
- Finally, review the information provided and select Create instance.
That’s all that’s required to provision the Amazon Connect service. Pretty simple stuff. It takes a few minutes to provision, then you’ll be ready to begin configuring your Amazon Connect tenant.
Configuring Amazon Connect
Next, we need to claim a phone number to be used with our service:
- Once Amazon Connect has been provisioned, click Get started to log into your Amazon Connect instance.
- On the Welcome to Amazon Connect page, select Let’s Go.
-
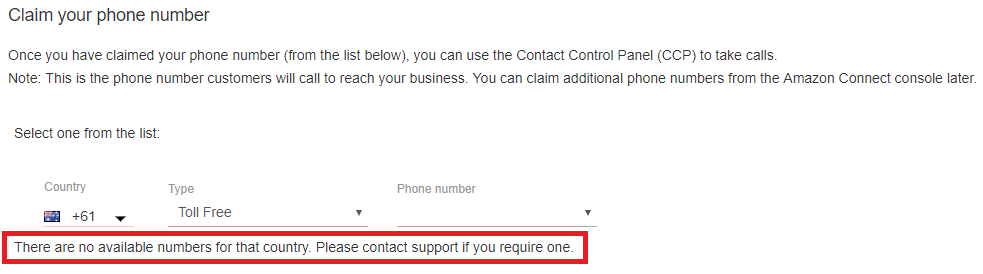
To claim a phone number, select your preferred country code and type then select Next. You may find that there are no available numbers for your country of choice (like the screenshot below). If that’s the case and it’s necessary that you have a local number, you can raise a support case with Amazon. For testing purposes, I’m happy to provision a US number and use Google Hangouts to dial the number for free.
- When prompted to make a call, choose Skip for now.
You should now be at the Amazon Connect dashboard where there are several options, but before we can continue, we first need to add the Lex bot to Amazon Connect to allow it to be used within a contact flow.
Adding Lex to Amazon Connect
- Switch back to the AWS Console and navigate to Amazon Connect.
- Select the Amazon Connect instance alias created in the previous step.
- On the left-hand side, select Contact Flows.
- Under the Amazon Lex section, click Add Lex Bot, and select the user administration bot we created.
- Select Save Lex Bots.
Now that our bot has been added to Amazon Connect, we should be able to create an appropriate Contact Flow that leverages our bot.
Creating the Contact Flow
- Switch back to the Amazon Connect dashboard then navigate to Contact Flows under routing on the left sidebar.
- Select Create contact flow and enter a name (e.g. User administration) for the contact flow.
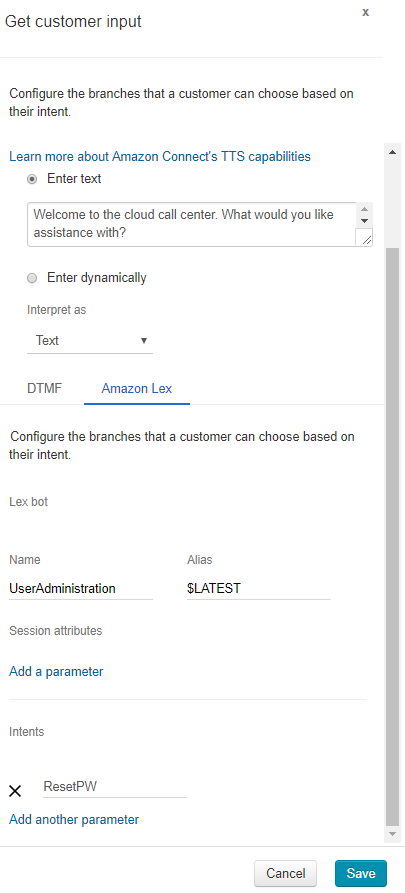
- Expand the Interact menu item then click and drag Get customer input to the grid.
- Click the Get customer input item, and set the following properties:
- Enable Text to speech then add a greeting text (e.g. Welcome to the cloud call center. What would you like assistance with?).
- Ensure that Interpret as is set to Text
- Choose the Amazon Lex option, then add the Lex Bot name (e.g. UserAdministration) and set the alias to $LATEST to ensure it uses the latest build of the bot.
- Under Intents, select Add a parameter then enter the password reset intent for the Lex Bot (e.g. ResetPW)
-
Select Save to save the configuration.
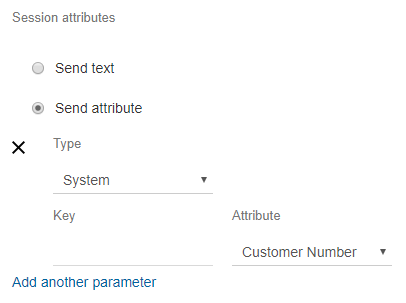
It’s worth noting that if you wanted to send the user’s mobile number through to your Lex bot for verification purposes, this can be done by sending a session attribute as shown below. The phone number will be passed to the Lambda function in the sessionAttributes object.
-
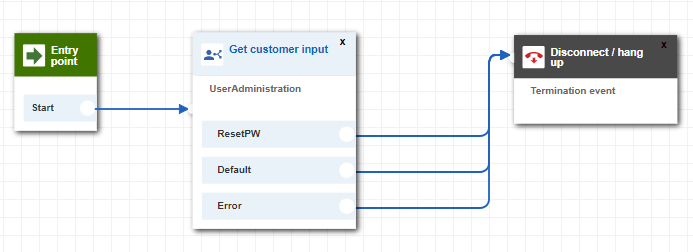
On the left sidebar, expand Terminate/Transfer then drag and drop Disconnect/Hang up onto the grid.
-
Connect the Start entry point to the Get Customer Input box and connect all the branches of the Get Customer Input Box to the Disconnect/Hang up box as shown below.
We could have added more complex flows to deal with unrecognised intents or handle additional requests that our Lex bot isn’t configured for (both of which would be forwarded to a human agent), however this is outside the scope of this blog post.
- In the top right-hand corner above the grid, select the down arrow, then Save & Publish.
Setting the Contact Flow
Now that we have a contact flow created, we need to attach it to the phone number we provisioned earlier.
- On the left sidebar in the Amazon Connect console, select Phone Numbers under the Routing menu then select the phone number listed.
- Under the Contact Flow/IVR dropdown menu, select the Contact flow you created, then select Save.
Testing the Contact Flow
Now that we’ve associated the contact flow with the phone number, you’re ready for testing! Remember, if you’ve provisioned a number in the US (and you’re overseas), you can dial for free using Google hangouts.
That’s it! You now have a fully functioning chatbot that can be called and spoken to. From here, you can add more intents to build a bot that can handle several simple user administration tasks.
A few things worth noting:
- You may notice that Lex repeats the user ID as a number, rather than individual digits. Unfortunately, Amazon Connect doesn’t support SSML content from Lex at this time however it’s in the product roadmap.
- You can view missed utterances on the Monitoring tab on your Lex bot and potentially add them to existing intents. This is a great way to monitor and expand on the capability of your bot.