The service desk with bots using Amazon Lex and Amazon Connect (Part 1)
What! Is this guy for real? Does he really think he can replace the front line of IT with pre-canned conversations?” I must admit, it’s a bold statement. The IT Service Desk has been around for years and has been the foot in the door for most of us in the IT industry. It’s the face of IT operations and plays an important role in ensuring an organisation’s staff can perform to the best of their abilities. But what if we could take some of the repetitive tasks the service desk performs and automate them? Not only would we be saving on head count costs, we would be able to ensure correct policies and procedures are followed to uphold security and compliance. The aim of this blog is to provide a working example of the automation of one service desk scenario to show how easy and accessible the technology is, and how it can be applied to various use cases.
To make it easier to follow along, I’ve broken this blog up into a number of parts. Part 1 will focus on the high-level architecture for the scenario and begin creating the Lex chatbot.
Scenario
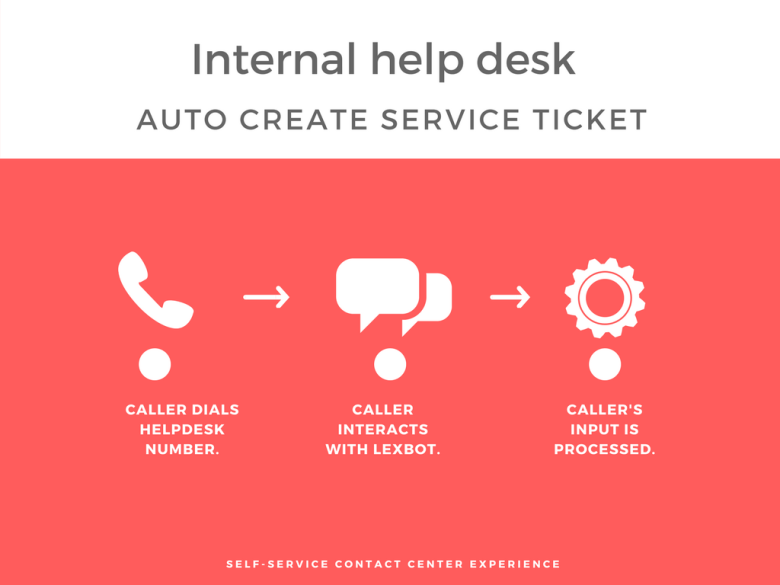
Arguably, the most common service desk request is the password reset. While this is a pretty simple issue for the service desk to resolve, many service desk staff seem to skip over, or not realise the importance of user verification. Both the simple resolution and the strict verification requirement make this a prime scenario to automate.
Architecture
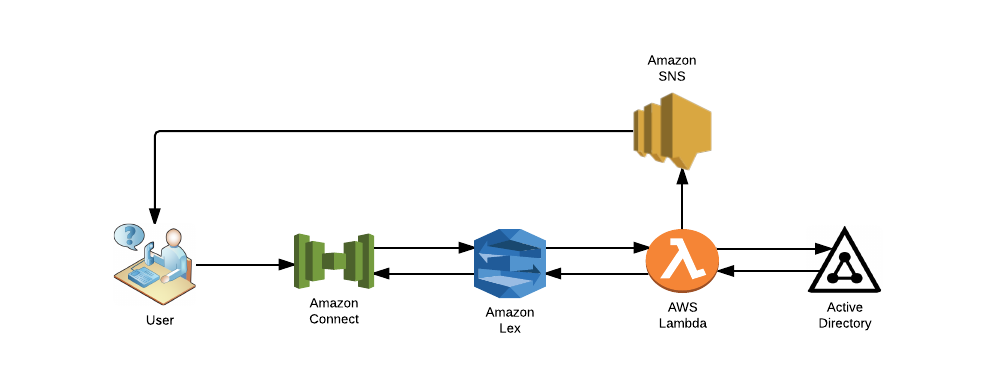
So what does the architecture look like? The diagram below dictates the expected process flow. Let’s step through each item in the diagram.
Amazon Connect
The process begins when the user calls the service desk and requests to have their password reset. In our architecture, the service desk uses Amazon Connect which is a cloud based customer contact centre service, allowing you to create contact flows, manage agents, and track performance metrics. We’re also able to plug in an Amazon Lex chatbot to handle user requests and offload the call to a human if the chatbot is unable to understand the user’s intent.
Amazon Lex
After the user has stated their request to change their password, we need to begin the user verification process. Their intent is recognised by our Amazon Lex chatbot, which initiates the dialog for the user verification process to ensure they are who they really say they are.
AWS Lambda
After the user has provided verification information, AWS Lambda, which is a compute on demand service, is used to validate the user’s input and verify it against internal records. To do this, Lambda interrogates Active Directory to validate the user.
Amazon SNS
Once the user has been validated, their password is reset to a random string in Active Directory and the password is messaged to the user’s phone using Amazon’s Simple Notification Service. This completes the interaction.
Building our Chatbot
Before we get into the details, it’s worth mentioning that the aim of this blog is to convey the technology capability. There’s many ways of enhancing the solution or improving validation of user input that I’ve skipped over, so while this isn’t a finished production ready product, it’s certainly a good foundation to begin building an automated call centre.
To begin, let’s start with building our Chatbot in Amazon Lex. In the Amazon Console, navigate to Amazon Lex. You’ll notice it’s only available in Ireland and US East. As Amazon Connect and my Active Directory environment is also in US East, that’s the region I’ve chosen.
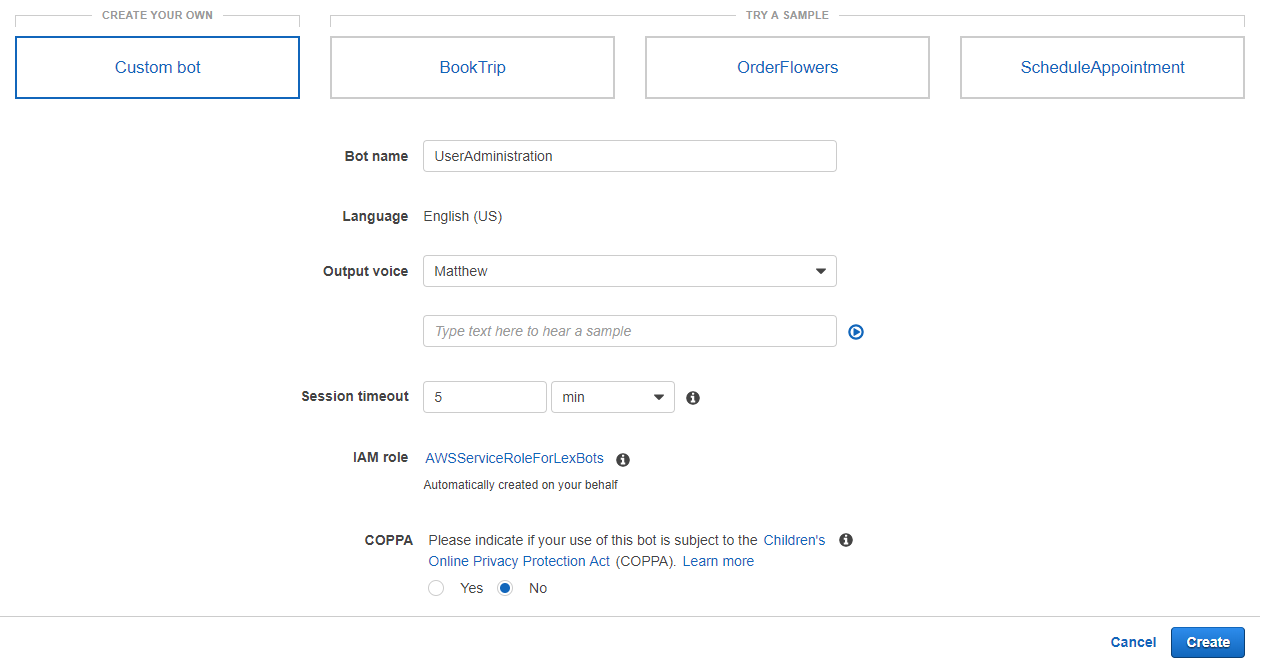
Go ahead and select Create Bot, then choose to create your own Custom Bot. I’ve named mine “UserAdministration”. Choose an Output voice and set the session timeout to 5 minutes. An IAM Role will automatically be created on your behalf to allow your bot to use Amazon Polly for speech. For COPPA, select No, then select Create.
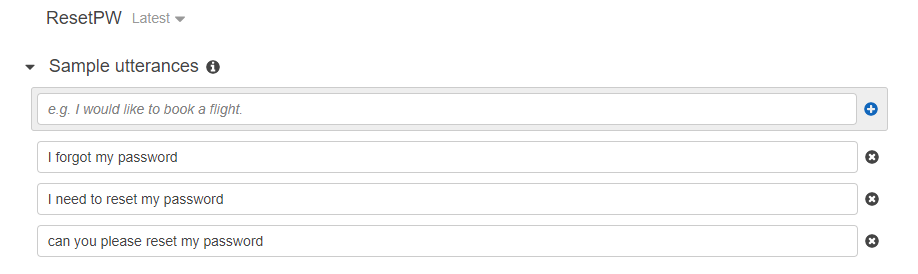
Once the bot has been created, we need to identify the user action expected to be performed, which is known as an intent. A bot can have multiple intents, but for our scenario, we’re only creating one, which is the password reset intent. Go ahead and select Create Intent, then in the Add Intent window, select Create new intent. My intent name is “ResetPW”. Select Add, which should add the intent to your bot. We now need to specify some expected sample utterances, which are phrases the user can use to trigger the Reset Password intent. There’s quite a few that could be listed here, but I’m going to limit mine to the following:
- I forgot my password
- I need to reset my password
- Can you please reset my password
The next section is the configuration for the Lambda validation function. Let’s skip past this for the time being and move onto the slots. Slots are used to collect information from the user. In our case, we need to collect verification information to ensure the user is who they say they are. The verification information collected is going to vary between environments. I’m looking to collect the following to verify against Active Directory:
- User ID – In my case, this is a 6-digit employee number that is also the sAMAccountName in Active Directory
- User’s birthday – This is a custom attribute in my Active Directory
- Month started – This is a custom attribute in my Active Directory
In addition to this, it’s also worth collecting and verifying the user’s mobile number. This can be done by passing the caller ID information from Amazon Connect, however we’ll skip this, as the bulk of our testing will be text chat and we need to ensure we have a consistent experience.
To define a slot, we need to specify three items:
- Name of the slot – Think of this as the variable name.
- Slot type – The data type expected. This is used to train the machine learning model to recognise the value for the slot.
- Prompt – How the user is prompted to provide the value sought.
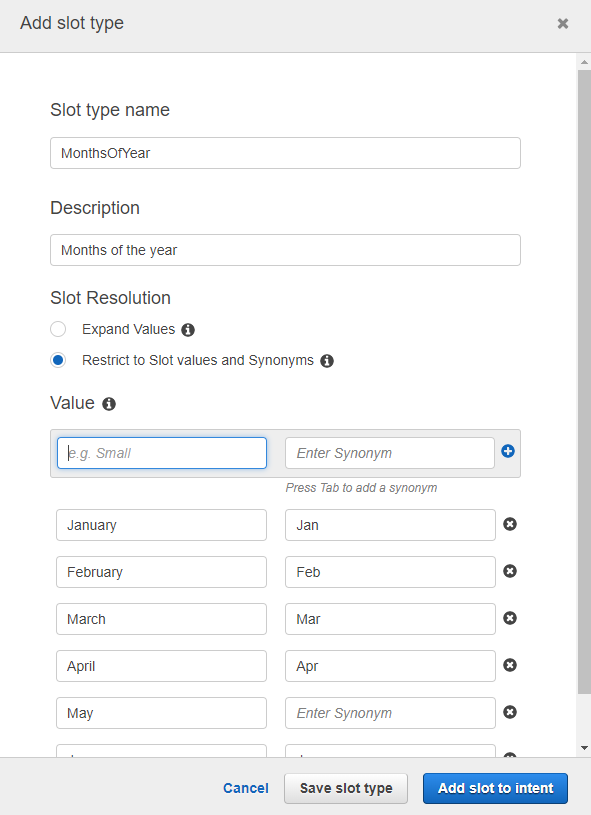
Many slot types are provided by Amazon, two of which has been used in this scenario. For “MonthStarted”, I’ve decided to create my own custom slot type, as the in-built “AMAZON.Month” slot type wasn’t strictly enforcing recognisable months. To create your own slot type, press the plus symbol on the left-hand side of the page next to Slot Types, then provide a name and description for your slot type. Select to Restrict to Slot values and Synonyms, then enter each month and its abbreviation. Once completed, click Add slot to intent.
Once the custom slot type has been configured, it’s time to set up the slots for the intent. The screenshot below shows the slots that have been configured and the expected order to prompt the user.

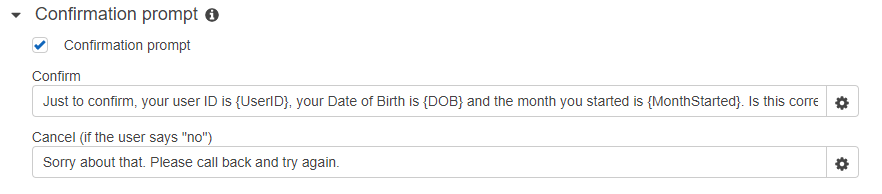
Last step (for this blog post), is to have the bot verify the information collected is correct. Tick the Confirmation Prompt box and in the Confirm text box provided, enter the following:
Just to confirm, your user ID is {UserID}, your Date of Birth is {DOB} and the month you started is {MonthStarted}. Is this correct?
For the Cancel text box, enter the following: Sorry about that. Please call back and try again.
Be sure to leave the fulfillment to Return parameters to client and hit Save Intent.
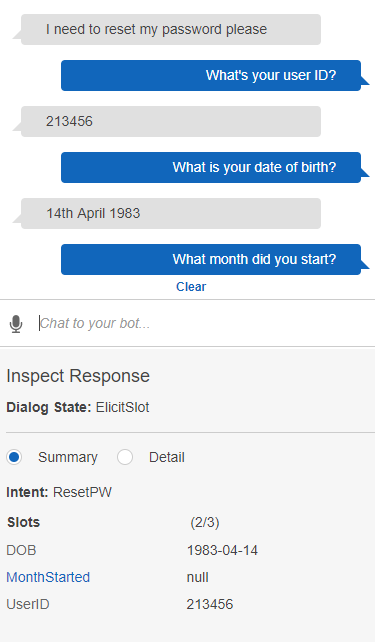
Great! We’ve built the bare basics of our bot. It doesn’t really do much yet, but let’s take it for a spin anyway and get a feel for what to expect. In the top right-hand corner, there’s a build button. Go ahead and click the button.
This takes some time, as building a bot triggers machine learning and creates the models for your bot. Once completed, the bot should be available to text or voice chat on the right side of the page. As you move through the prompts, you can see at the bottom the slots getting populated with the expected format. i.e. 14th April 1983 is converted to 1983-04-14.
So at the moment, our bot doesn’t do much but collect the information we need. Admittedly, the conversation is a bit robotic as well. In the next few blogs, we’ll give the bot a bit more of a personality, we’ll do some input validation, and we’ll begin to integrate with Active Directory. Once we’ve got our bot working as expected, we’ll bolt on Amazon Connect to allow users to dial in and converse with our new bot.
Creating the Lambda initialisation and validation function
As data validation requires compute, we’ll need to start by creating an AWS Lambda function. Head over to the AWS console, then navigate to the AWS Lambda page. Once you’re there, select Create Function and choose to Author from Scratch then specify the following:
- Name: ResetPWCheck
- Runtime: Python 2.7 (it’s really a matter of preference)
- Role: I use an existing Out of the Box role, “Lambda_basic_execution”, as I only need access to CloudWatch logs for debugging.
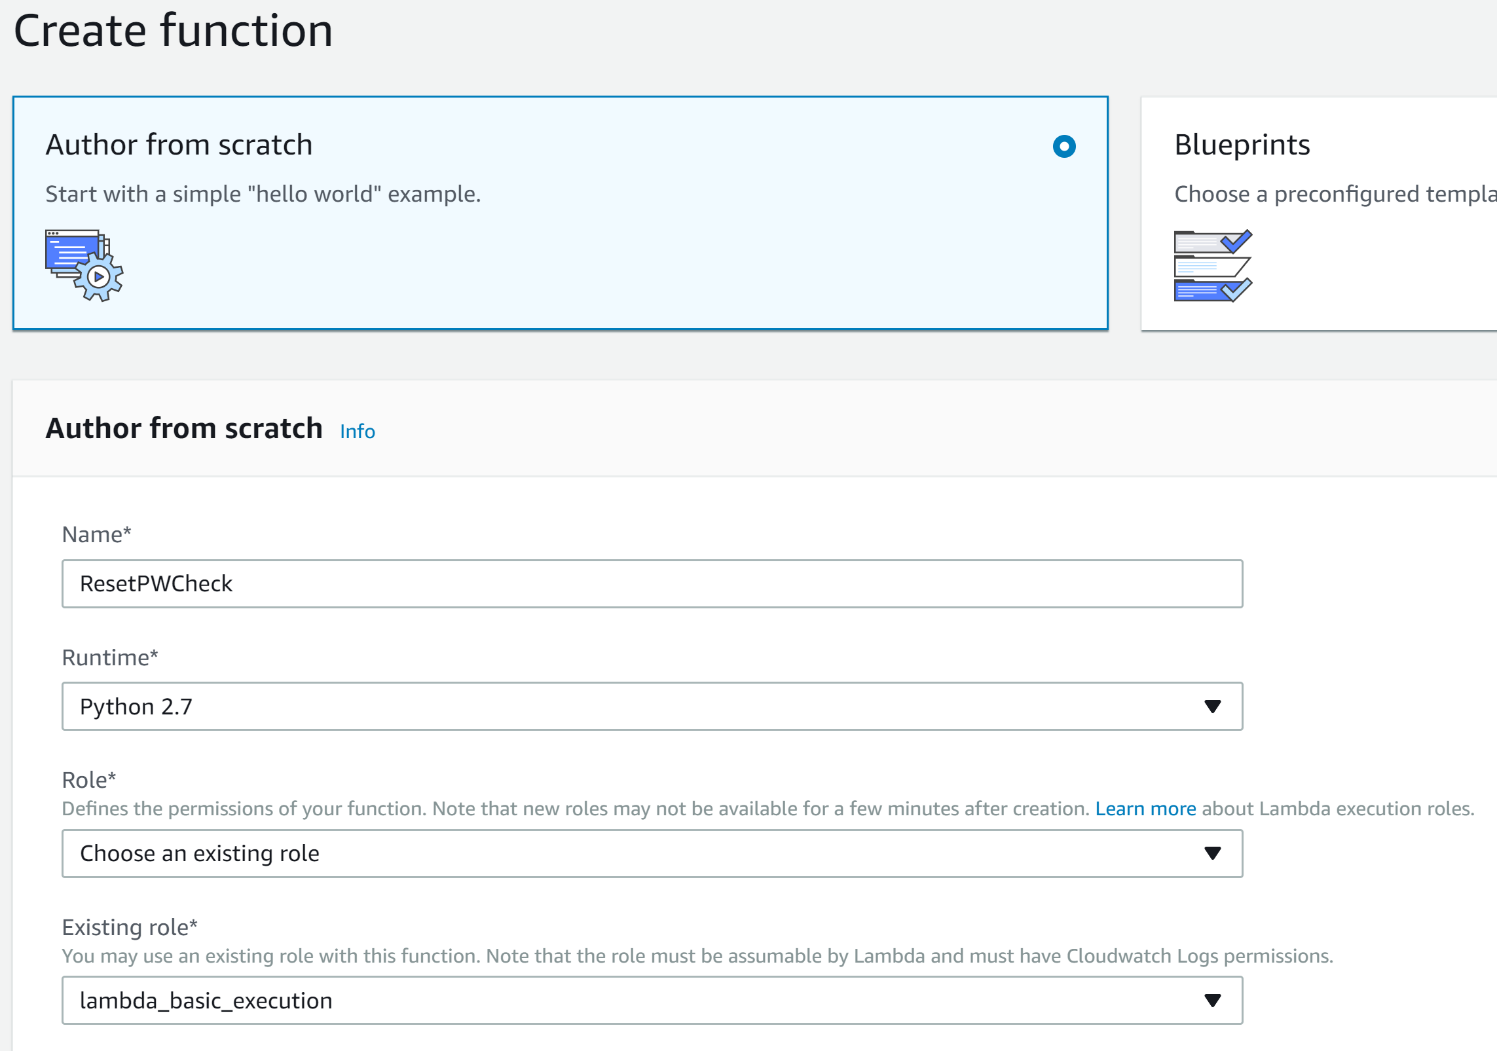
Once you’ve populated all the fields, go ahead and select Create Function. The script we’ll be using is provided (further down) in this blog, however before we go through the script in detail, there are two items worth mentioning.
Input Events and Response Formats
It’s well worth familiarising yourself with the page on Lambda Function Input Event and Response Formats in the Lex Developer guide. Every time input is provided to Lex, it invokes the Lambda initalisation and validation function. For example, when I tell my chatbot “I need to reset my password”, the lambda function is invoked and the following event is passed:
{
    "currentIntent": {
        "slots": {
            "DOB": None,
            "MonthStarted": None,
            "UserID": None
        },
        "confirmationStatus": "None",
        "name": "ResetPW",
        "slotDetails": {
            "DOB": {
                "originalValue": None,
                "resolutions": []
            },
            "MonthStarted": {
                "originalValue": None,
                "resolutions": []
            },
            "UserID": {
                "originalValue": None,
                "resolutions": []
            }
        }
    },
    "userId": "sd0xe8xzbgf1kyvtbnzsuymxky2a5bnq",
    "bot": {
        "alias": "$LATEST",
        "version": "$LATEST",
        "name": "UserAdministration"
    },
    "inputTranscript": "I need to reset my password",
    "requestAttributes": None,
    "invocationSource": "DialogCodeHook",
    "outputDialogMode": "Text",
    "messageVersion": "1.0",
    "sessionAttributes": {}
}
Amazon Lex expects a response from the Lambda function in JSON format that provides it with the next dialog action.
Persisting Variables with Session Attributes
There are many ways to determine within your Lambda function where you’re up to in your chat dialog, however my preferred method is to pass state information within the SessionAttributes object of the input event and response as a key/value pair. The SessionAttributes can persist between invocations of the Lambda function (every time input is provided to the chatbot), however you must remember to collect and pass the attributes between input and responses to ensure it persists.
Input Validation Code
With that out of the way, let’s begin looking at the code. The below script is what I’ve used which you can simply copy and paste, assuming you’re using the same slot and intent names in your Lex bot that were used.
def elicit_slot(messageType, messageContent, slots, slotToElicit, completed):
    response = {
        "sessionAttributes": {
            "Completed": completed
        },
        "dialogAction": {
            "type": "ElicitSlot",
            "message": {
                "contentType": messageType,
                "content": messageContent
            },
            "intentName": "ResetPW",
            "slots": slots,
            "slotToElicit": slotToElicit
        }
    }
    return response


def delegate_slot(slots, completed):
    response = {
        "sessionAttributes": {
            "Completed": completed
        },
        "dialogAction": {
            "type": "Delegate",
            "slots": slots
        }
    }
    return response


def chkUserId(slots, sessionAttributes):
    if((slots['UserID'] is None) or ((slots["UserID"] is not None) and (len(slots["UserID"]) != 6))):
        messageContent = "That format seems incorrect. Let's try again. What is your user id?"
        return elicit_slot("PlainText", messageContent, slots, "UserID", "None")
    else:
        return delegate_slot(slots, "userid")


def chkDob(slots, sessionAttributes):
    if(slots["DOB"] is None):
        messageContent = "That format seems incorrect. Let's try again. What is your Date of Birth?"
        return elicit_slot("PlainText", messageContent, slots, "DOB", "userid")
    else:
        return delegate_slot(slots, "dob")


def chkMonth(slots, sessionAttributes, confirmation, outputDialogMode):
    if(slots["MonthStarted"] is None):
        messageContent = "That month seems incorrect. Let's try again. What month did you start?"
        return elicit_slot("PlainText", messageContent, slots, "MonthStarted", "dob")
    else:
        return confirmIntent(slots, sessionAttributes, confirmation, outputDialogMode)


def confirmIntent(slots, sessionAttributes, confirmation, outputDialogMode):
    if(confirmation == "None"):
        endData = {
            "dialogAction": {
                "type": "ConfirmIntent",
                "message": {
                },
                "intentName": "ResetPW",
                "slots": slots
            }
        }
        if(outputDialogMode == "Voice"):
            endData["dialogAction"]["message"]["contentType"] = "SSML"
            endData["dialogAction"]["message"]["content"] = "<speak>Just to confirm, your user id is <say-as interpret-as=\"digits\">" + slots["UserID"] + \
                "</say-as>, your date of birth is " + \
                slots["DOB"] + " and the month of your start date is " + \
                slots["MonthStarted"] + ". Is that correct?</speak>"
        else:
            endData["dialogAction"]["message"]["contentType"] = "PlainText"
            endData["dialogAction"]["message"]["content"] = "Just to confirm, your user id is " + slots["UserID"] + \
                ", your date of birth is " + \
                slots["DOB"] + " and the month of your start date is " + \
                slots["MonthStarted"] + ". Is that correct?"
    elif((confirmation == "Denied")):
        endData = {
            "dialogAction": {
                "type": "Close",
                "fulfillmentState": "Failed",
                "message": {
                    "contentType": "PlainText",
                    "content": "Please call back and try again."
                }
            }
        }
    else:
        endData = delegate_slot(slots, "confirmed")
    return endData


def lambda_handler(event, context):
    slots = event['currentIntent']['slots']
    sessionAttributes = event['sessionAttributes']
    confirmation = event['currentIntent']["confirmationStatus"]
    outputDialogMode = event["outputDialogMode"]

    if(sessionAttributes is None or "Completed" not in sessionAttributes):
        messageContent = "Sure, i can help with that! But first, i need to verify your identity. What is your user id?"
        return elicit_slot("PlainText", messageContent, slots, "UserID", "None")

    if(sessionAttributes["Completed"] == "None"):
        return chkUserId(slots, sessionAttributes)

    if(sessionAttributes["Completed"] == "userid"):
        return chkDob(slots, sessionAttributes)

    if(sessionAttributes["Completed"] == "dob"):
        return chkMonth(slots, sessionAttributes, confirmation, outputDialogMode)
Let’s break it down.
When the lambda function is first invoked, we check to see if any state is set in the sessionAttributes. If not, we can assume this is the first time the lambda function is invoked and as a result, provide a welcoming response while requesting the User’s ID. To ensure the user isn’t welcomed again, we set a session state so the Lambda function knows to move to User ID validation when next invoked. This is done by setting the “Completed” : “None” key/value pair in the response SessionAttributes.
if(sessionAttributes is None or "Completed" not in sessionAttributes):
        messageContent = "Sure, i can help with that! But first, i need to verify your identity. What is your user id?"
        return elicit_slot("PlainText", messageContent, slots, "UserID", "None")
Next, we check the User ID. You’ll notice the chkUserId function checks for two things; That the slot is populated, and if it is, the length of the field. Because the slot type is AMAZON.Number, any non-numeric characters that are entered will be rejected by the slot. If this occurs, the slot will be left empty, hence this is something we’re looking out for. We also want to ensure the User ID is 6 digits, otherwise it is considered invalid. If the input is correct, we set the session state key/value pair to indicate User ID validation is complete then allow the dialog to continue, otherwise we request the user to re-enter their User ID.
def chkUserId(slots, sessionAttributes):
    if((slots['UserID'] is None) or ((slots["UserID"] is not None) and (len(slots["UserID"]) != 6))):
        messageContent = "That format seems incorrect. Let's try again. What is your user id?"
        return elicit_slot("PlainText", messageContent, slots, "UserID", "None")
    else:
        return delegate_slot(slots, "userid")
Next, we check the Date of Birth. Because the slot type is strict regarding input, we don’t do much validation here. An utterance for this slot type generally maps to a complete date: YYYY-MM-DD. For validation purpose, we’re just looking for an empty slot. Like the User ID check, we set the session state and allow the dialog to continue if all looks good.
def chkDob(slots, sessionAttributes):
    if(slots["DOB"] is None):
        messageContent = "That format seems incorrect. Let's try again. What is your Date of Birth?"
        return elicit_slot("PlainText", messageContent, slots, "DOB", "userid")
    else:
        return delegate_slot(slots, "dob")
Finally, we check the last slot which is the Month Started. Assuming the input for the month started is correct, we then confirm the intent by reading all the slot values back to the user and asking if it’s correct. You’ll notice here that there’s a bit of logic to determine if the user is using voice or text to interact with Lex. If voice is used, we use Speech Synthesis Markup Language (SSML) to ensure the UserID value is read as digits, rather than as the full number. If the user is happy with the slot values, the validation completes and Lex then moves to the next Lambda function to fulfil the intent (next blog). If the user isn’t happy with the slot values, the lambda function exits telling the user to call back and try again.
def confirmIntent(slots, sessionAttributes, confirmation, outputDialogMode):
    if(confirmation == "None"):
        endData = {
            "dialogAction": {
                "type": "ConfirmIntent",
                "message": {
                },
                "intentName": "ResetPW",
                "slots": slots
            }
        }
        if(outputDialogMode == "Voice"):
            endData["dialogAction"]["message"]["contentType"] = "SSML"
            endData["dialogAction"]["message"]["content"] = "<speak>Just to confirm, your user id is <say-as interpret-as=\"digits\">" + slots["UserID"] + \
                "</say-as>, your date of birth is " + \
                slots["DOB"] + " and the month of your start date is " + \
                slots["MonthStarted"] + ". Is that correct?</speak>"
        else:
            endData["dialogAction"]["message"]["contentType"] = "PlainText"
            endData["dialogAction"]["message"]["content"] = "Just to confirm, your user id is " + slots["UserID"] + \
                ", your date of birth is " + \
                slots["DOB"] + " and the month of your start date is " + \
                slots["MonthStarted"] + ". Is that correct?"
    elif((confirmation == "Denied")):
        endData = {
            "dialogAction": {
                "type": "Close",
                "fulfillmentState": "Failed",
                "message": {
                    "contentType": "PlainText",
                    "content": "Please call back and try again."
                }
            }
        }
    else:
        endData = delegate_slot(slots, "confirmed")
    return endData
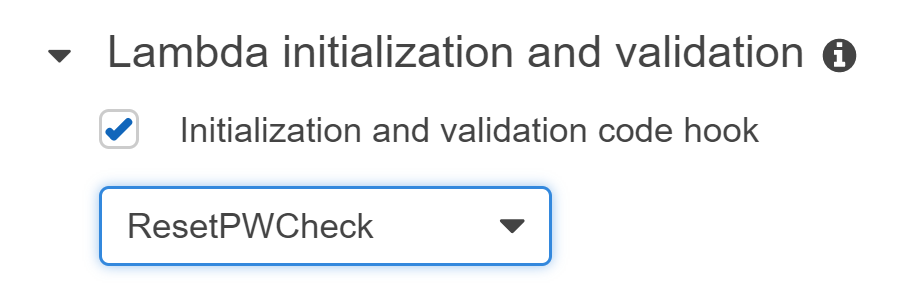
Okay, now that our Lambda function is finished, we need to enable it as a code hook for initialisation and validation. Head over to your Lex bot, select the “ResetPW” intent, then tick the box under Lambda initialisation and validation and select your Lambda function. A prompt will be given to provide permissions to allow your Lex bot to invoke the lambda function. Select OK.
Let’s hit Build on the chatbot, and test it out.
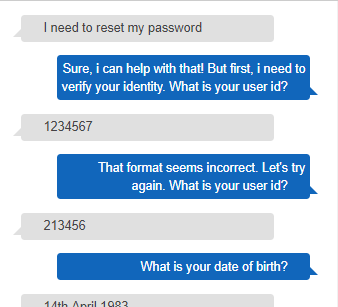
So, we’ve managed to make the conversation a bit more human like and we can now detect invalid input. If you use the microphone to chat with your bot, you’ll notice the User ID value is read as digits. That’s it for this blog. Next blog, we’ll integrate Active Directory and actually get a password reset and sent via SNS to a mobile phone.