
How to build an eCommerce app using ReactJS
“Why use React for eCommerce” is the one of the biggest question clients ask to a developer. Built by Facebook, ReactJS is one of the largely used UI Library that helps with the creation of beautiful web applications requiring minimal effort and coding. Things like Atomic design principles, component-driven approach, high-speed etc, make React js a popular choice of framework for building eCommerce web applications.

A few weeks ago, when I wrote about React performance, I was asked by a lot of you to share my thoughts on how to build a performant interface for eCommerce app using ReactJS. And, as I wrote email responses, this blog post started taking its shape.
We don’t just fine tune eCommerce apps for no reason. The fact that your product team has to struggle and match various metrics with conversion and performance itself shows how even the tiniest bit of UI performance gain reflects into a significant revenue boost.
What you can expect to learn here:
- The key points which makes React best fit for an eCommerce site’s frontend
- The practical use case of using Redux for eCommerce
- The best practice of architecting an eCommerce app with Redux
Just to give you a better overview, this is what our eCommerce app with ReactJS will look like:

Building eCommerce app with ReactJS – Things to Consider
Expansion is the goal of any eCommerce organisation. And why not? Your business wasn’t built to be small.
The frontend of an eCommerce app acts as an indicator of the quality of your products and overall brand value. But above all else, it provides a certain level of trust and comfort to the user.
Do you know that
“About 97% of an eCommerce performance optimisation is only Front-end related, leaving beside only 3% for back-end.”?
This is how insanely impactful an eCommerce front end really is!
Moreover, an eCommerce frontend might gets often updated for even minor changes (like changing a font) on the special days of sale such as good-Friday which requires deploying the update to the entire system.
Henceforth, frontend performance optimization needs to be handled with care otherwise you might end up breaking your app which would be otherwise expensive for your business.
So, how does we handle all frontend-related optimization in eCommerce?
Well, the answer is, USE React…
While modern web has Angular, Vue and other frameworks to help support building complex UIs, with the exception of Vue, we face issues with unnecessary complexities with them.
Benefits of using Reactjs for eCommerce frontend
I’ve been working extensively in eCommerce segment for over a year and a half. In that crucial time, I’ve had experienced my fair-share of architectural mistakes, poor design-related decisions, technical debt and learned many things or two.
One of the greatest things I’ve learned in these on & half years is that React really wants you to follow KISS (Keep it Simple, Stupid) and Atomic design principles.
I won’t delve upon KISS principle assuming that you will understand it through the link itself. Instead, let’s first understand the Atomic design principles for building complex user-interfaces.
React : How Atomic Design principle helps in building eCommerce app?
According to the Brad Frost,
“Atomic design is methodology for creating design systems backed with five ‘building blocks’, which, when combined, create semantic, contextual relationships between interface objects.”
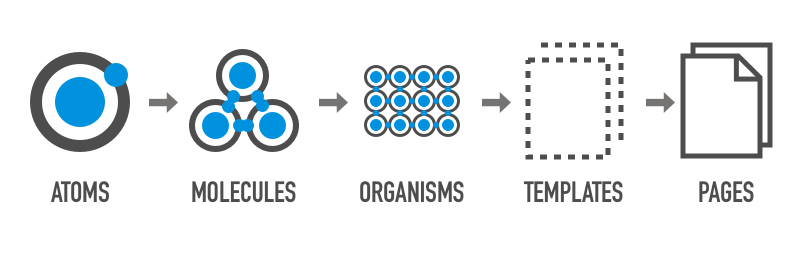
There are five building blocks in atomic design:
-
Atoms: Everything in Atomic design begins with the smallest elements of the interface: the atoms. These are small, contained and simplest components of an application.
-
Molecules: Molecules are groups of two or more atoms held together by chemical bonds.
-
Organisms: Organisms are assemblies of molecules functioning together as a unit.
-
Templates: Templates consist mostly of groups of organisms stitched together to form pages.
-
Pages: Pages are specific instances of templates.
Applying Atomic design principles to eCommerce
Now that we have understood what an Atomic design guidelines is, Let’s explore how to apply it while building a complex interface such as eCommerce.
To start with Atoms, let’s evaluate which components will act as atoms in eCommerce?
Atoms in ReactJS for eCommerce
Since Atoms are the smallest individual components of a webpage or an app. They can be anything such as a TextInput component or a Button component.
Molecule in ReactJS for eCommerce
Now, let’s say that we want to make a search module for eCommerce with a Button component and a TextInput component. When we combine these two components, we can create a Search component that acts as a molecule.

Organism in ReactJS for eCommerce
Organisms are most likely the complex UI elements of our eCommerce app. Since they’re more complex than molecules and atoms, it’s possible that the organisms in our applications need to handle business logic.
Let’s say, or Product page in eCommerce is made up of organisms such as a Header organism and a ProductGrid organism that contains Product molecules. Now, this is how our Header organism looks like:

Template in ReactJS for eCommerce
Templates are the combination of atoms, molecules and organisms altogether held in several containers. It is the combination of these smaller components which makes up user interfaces in our applications.
By combining all such atoms, molecules and organisms, we can finally build our Template which will be wireframe for our eCommerce app.

Benefits of Atomic Design principle in eCommerce
Above, we designed the wire-frame for our app using Atomic design principle. But, you might be wondering how Atomic designing principle is different than the typical component designing approach?
Let’s see how well they compete against each other.
Reusability of components
Well, I see Atomic Design as a neat approach of making our components reusable which is limited to identify when you are working the other way around.
Good Software developers usually emphasise on re-usability with a strong focus on DRY (DON’T REPEAT YOURSELF) principle.
The Image attached below illustrates three different levels of re-usability when it comes to a component-driven UI:
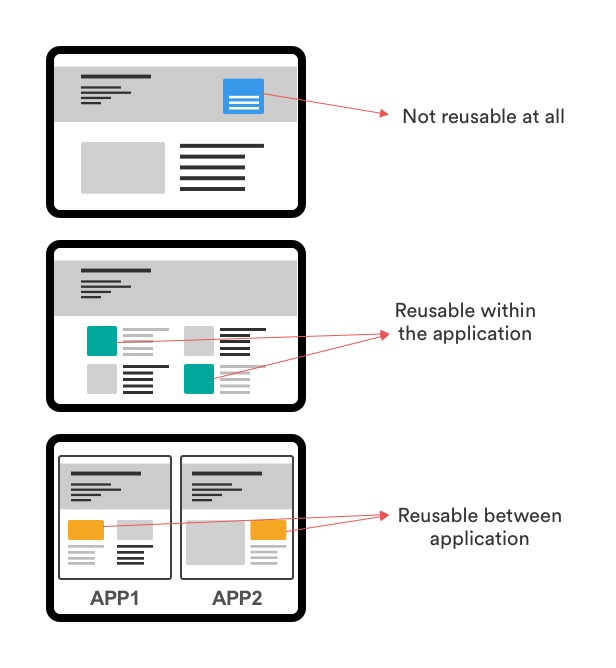
- LEVEL 1: Components that are least reusable or not at all reusable
- LEVEL 2: Components that can be reused within the application
- LEVEL 3: Components that can be shared between applications
While working with component-driven UI such as React, you usually will have to deal with second level of components that can be reused within the application.
To make you understand re-usability in simpler terms, I would like to take a simple example of a button.
There are about thousand ways to build a button. There is absolute zero sense in building the same button time and again whenever you are needing it in another place. An experienced UI developer would rather put all the logic that goes on building a button into a library such as NPM or Github and use it without hassle wherever needed.
Big boost in speed
Another biggest advantage of working with Atomic design approach such as React is a speed boost. Since you are working on a component, you can independently make changes to it without affecting the other components on UI. This means the component which needs updation will only get reloaded. Again, this is practically beneficial for an eCommerce web app where you definitely not want to frustrate your users by un-necessary reloading of the entire page every time they add an item in the cart.
Benefits of using ReactJS + Redux in eCommerce
Undoubtedly, ReactJS is wonderful for building eCommerce app but remember it will only act as a View layer for your app. This means, it is for all things related to your app’s user interface.
But, there are still some questions we need to ask ourselves:
- How can we navigate between webpages of our app?
- What will happen when you add an item to a cart?
Well, this is where we will need some data to work on. In React, a component is capable of managing its own data which we call as local state.
Local state of a React component could be for a current selected tab, user details or timer status. Now, the beauty of the React is that the state of an component is changeable in response to certain actions and events. The actions or events could be anything such as a network message, tab selection or a timer expiring.
If this is difficult for you to understand state, here’s a simple use-case which will become things more clear: Suppose you are using an Android app. You tap on “Start button” of the app which takes you towards the on-boarding screen. Now, there must be some trivial interaction going when you tap the button and navigates through the on-boarding screen. This trivial interaction is state or data which a developer has to deal with while developing an app.
Other than the typical button interaction mentioned in above example, the state of an app might have to deal with:
- What the user sees (data)?
- What information are we fetching?
- What URL are we showing to the user?
- What items are selected inside the page?
- Are there any errors in the applications? That’s state too.
Now, you can Imagine that even a typical ToDo app will have so-many states which are important to handle.
Although, we can always handle a state while storing it within the parent component. But, the same kind of approach will only work as long as your application remains simple and small, let alone the application be an eCommerce web app.
After all, we definitely don’t want to make our React component bloated? Right?
Now you might be wondering “Are there any alternatives other than keeping our state locally in parent component?”
Well, yes you can make your state global for which you have to use a tiny library which is called as Redux.
Redux was developed by Dan Aboramov to solve a problem that most app developer’s finds hard to deal in the beginning: it helps giving each React component the exact piece of state (date) it needs.
But, how does Redux do that? I will try to explain it in more simpler terms.
Unlike standard MVC frameworks, where data can flow between UI components and storage in both directions, Redux strictly allows data to flow in one direction only.
See the below illustration:
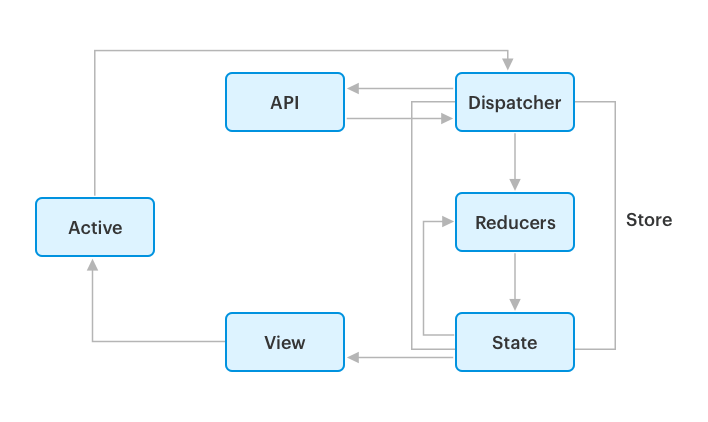
In Redux, your state is held in a container known as the store. There can be only one store within an application. The store usually resembles like a state tree where states for all objects are kept. Any UI component can access the state of a particular object directly from the store.
In order to change a state from a local or remote component, an action needs to be dispatched. Here Dispatch means sending actionable information to the store. Upon receiving an action, store delegates it to the relevant reducer. You can assume reducer as a pure function that looks at the previous state, performs an action and returns a new state.
These all might seem highly theoretical, and may seem a bit difficult to gulp down first for you. But once you practically apply it, you will get used to complex terminologies and understand how Redux works.
Let’s understand how Redux can help us in managing the state of an eCommerce app. Often, multiple components of a typical eCommerce web application may need to access the same state but display it in different ways.
A good example would be a classic “master / detail” view, where you have a list of items that shows a few summary values from each item (the master), and also a display component that shows all the details for the currently selected item (the detail).
Now, Keeping state consistent among multiple components can be a nightmare, especially if there are multiple channels being used to update the same object.
If you go through the React’s official documentation, you will read something like this: Lifting State up.
By “Lifting State up”, React wants us to put the data in the nearest ancestor of the two components.
In the above master/ detail example, Redux will allow individual components to be connected to the store which will help us just extract the pieces of data we need. With the help of Redux, we can extract the names of all items in the list and render them in a component called as productContainer. Moreover, the detailComponent will help us to extract the details of the items and display them. This prevents us passing down the data through multiple level of components thereby improving the performance which could have otherwise suffered with the un-necessary re-rendering.
Now that we have understood what role will be played by Redux in our eCommerce application, let’s learn some best practices of using it the right way.
Best Way to architect a React eCommerce App using Redux
You will find tons of article on internet that claims to make you learn Redux. I am not here to talk about it. Rather, I am here to talk about something that I find extremely important to share.
“It requires energy to make a system simple, and to intentionally apply that energy requires that one reason about, understand, and visualize the system as built. —- Grady Booch”
Building highly scalable software solutions requires a well-defined architecture. Designing a well-defined architecture requires you to visualize about the solution you are about to build.
Therefore, it is extremely important for you to learn how to visualise the app and then implement it in an effective manner. I am going to make you learn the same in next few paragraphs.
We have already prepared a wireframe of the app earlier, so the next step would be to define the architecture of our ReactJS eCommerce app.
But before we implement our Architecture, we need to visualise the whole application as one entity, and each page of the application as the sub-entity.
Laying out the Redux-based architecture of our eCommerce app will goes into four different stages:
- Visualise the state tree
- Design your reducers
- Implement Actions
- Implement Presentation
When we work in a development environment like React, our system tends to become more reactive to state.
Tal Kol, ex head of Wix Engineering once quoted
” Treat your app state in React as a first-class citizen —–Tal Kol”.
You can imagine how important is for us to get our app state right. This is why state visualisation becomes very important for us. Let’s understand how we can get it the right way.
Step #1 : Visualise the state tree
From the wireframe we designed, we will visualise the state tree which will make the Redux implementation in our eCommerce app much easier.
Let’s get started and visualise the state tree for the wholesome app.
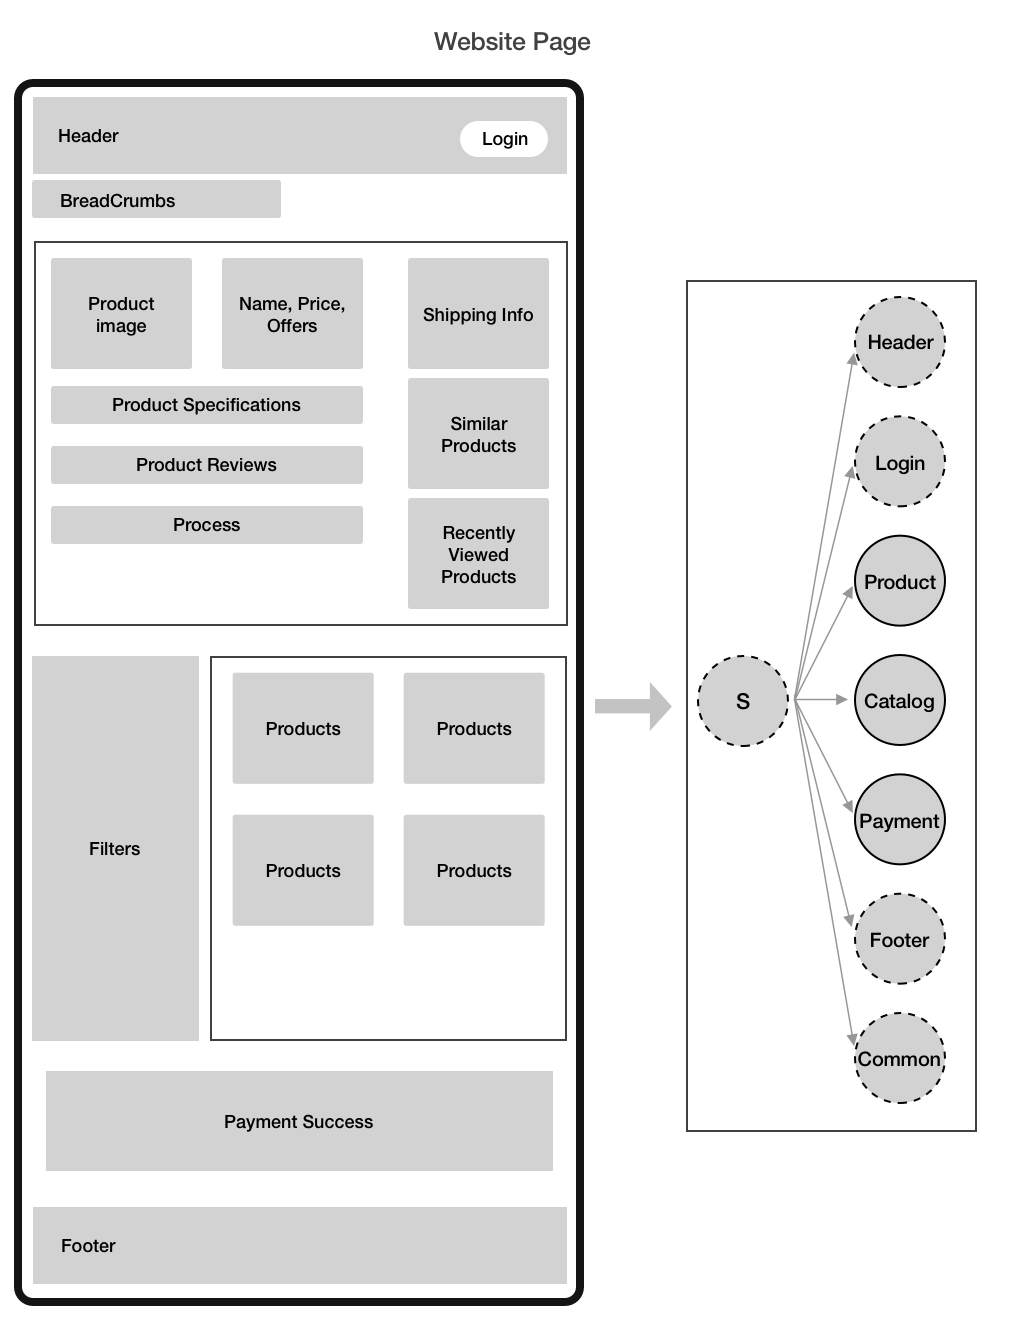
Pretty neat. Huh??
[Note: In the above image, dotted circles are states that will be shared by the application whereas solid circles are page-specific states.]
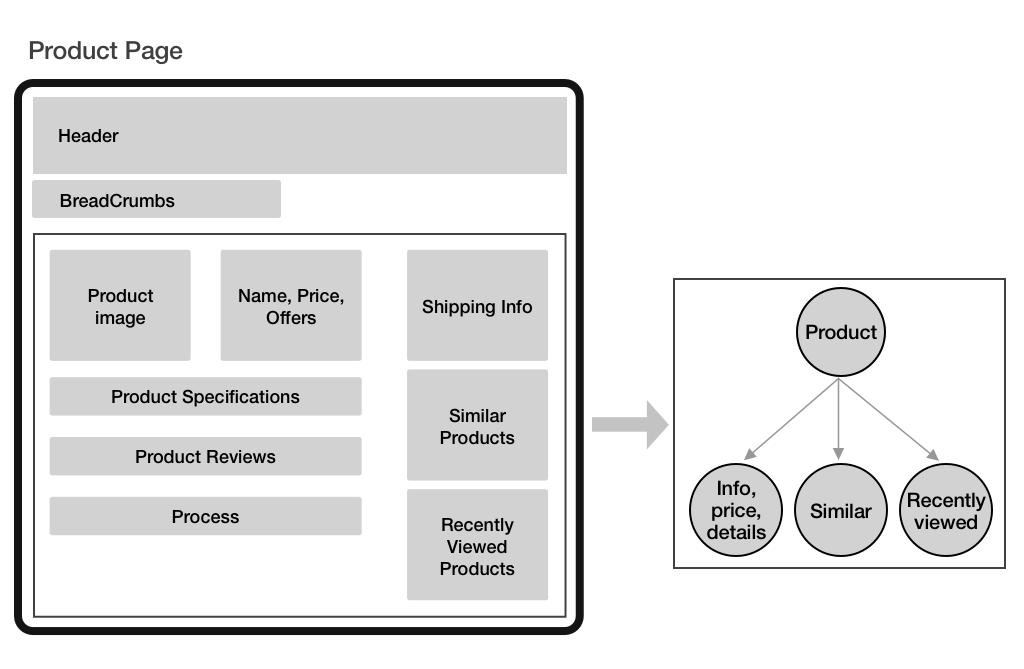
Similarly, Let’s visualise and draw state tree of other pages and important elements.
Product Description Page
Product Catalog Page
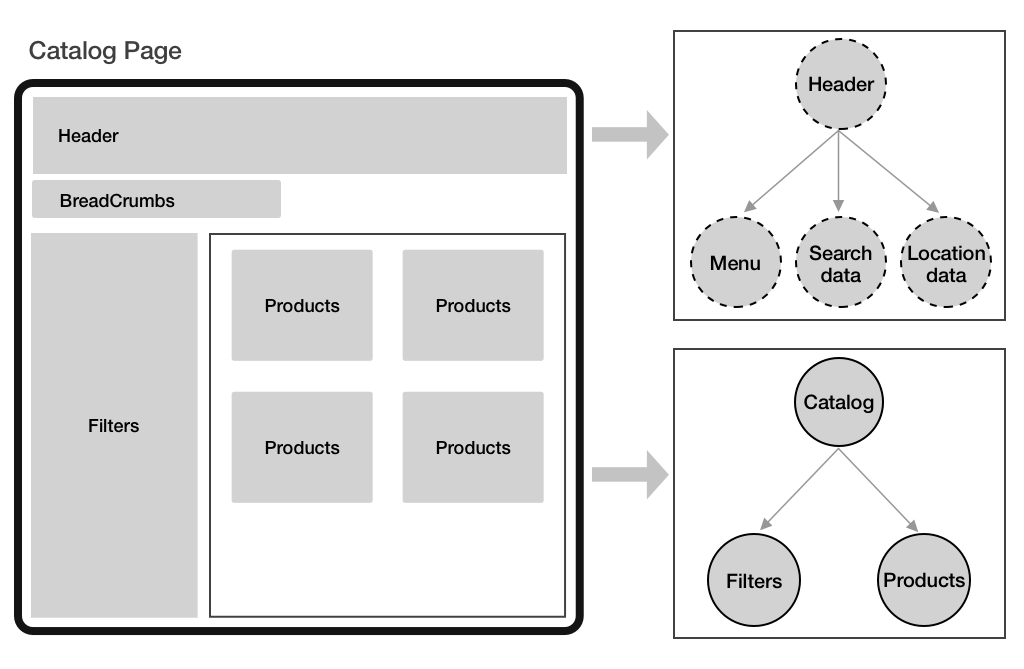
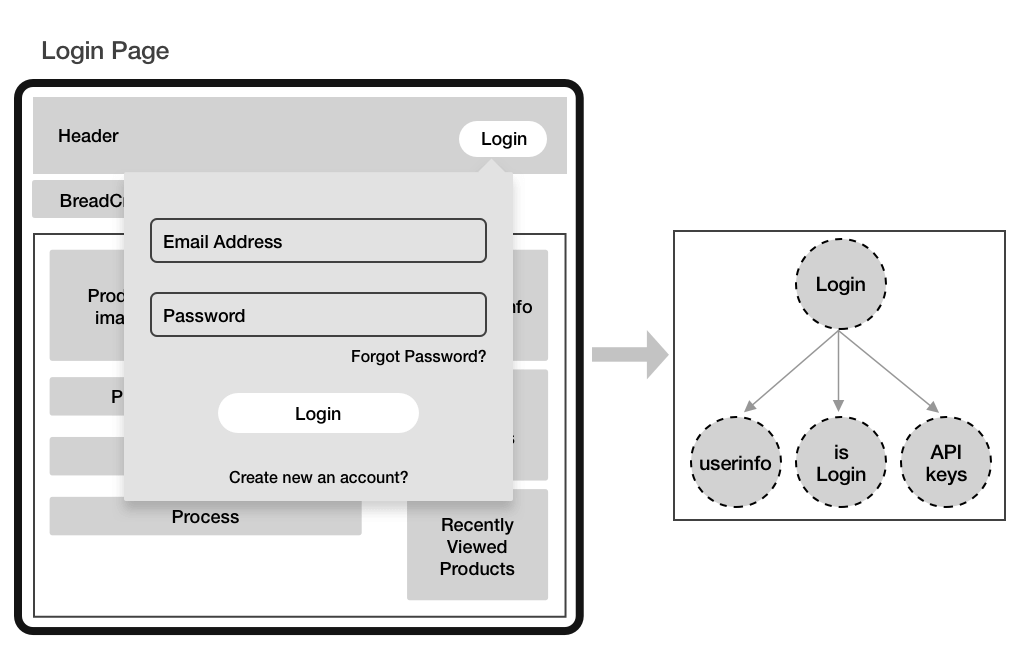
Login Page
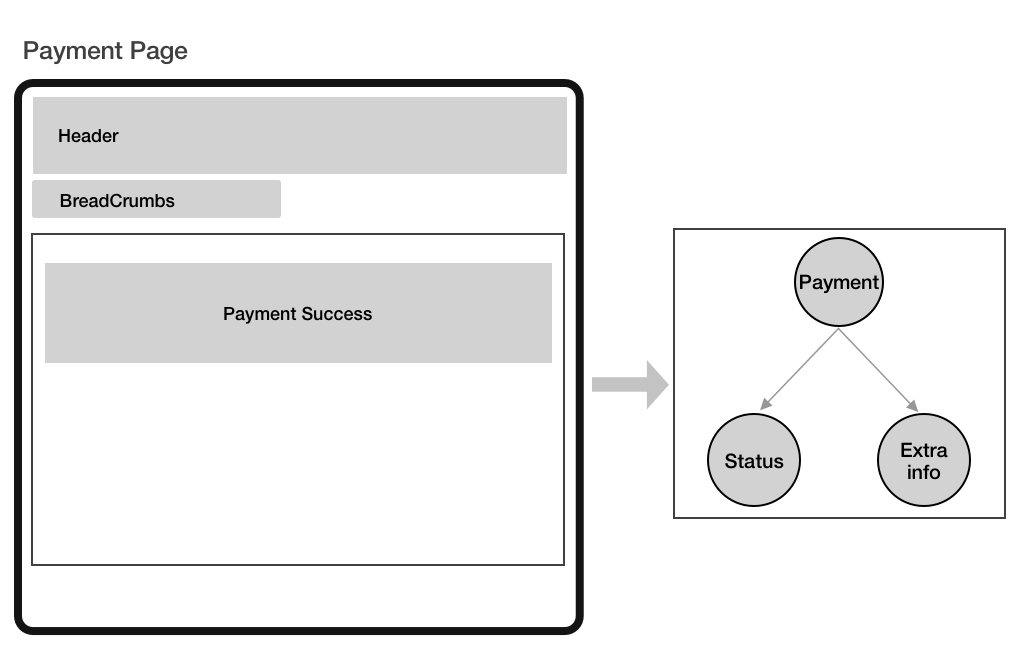
Payment Page
Now that we are done with the state visualisation, let’s jump to the step#2 which is designing the reducers.
Step#2 : Designing the Reducers
Designing the Reducers is one of an important step putting out eCommerce web app architecture.
To design our Reducers in a correct way, we need to make them as single source of Truth.
By the single source of truth, we are implying here that our app state should be stored in a single place so that if we need to access that state anywhere else in your app, then we can do it by reference to its single source of truth.
If reading all this makes your head spin then don’t worry I will explain it in a more neat way.
Every state of your app that seems important to us can have their own reducers. To represent the single source of truth, we can combine them in one root reduce which will eventually define the store. By doing so, we will have a total control over our eCommerce app states and their behaviour.
Referring to the wireframe of our application, we can have our Reducer’s designed and combined in one single file:
// Root Reducer
const rootReducer = combineReducer({
header: headerReducer,
login: loginReducer,
footer: footerReducer,
common: commonReducer,
product: productReducer,
catalog: catalogReducer,
payment: paymentReducer
});
Now you got my point?
Combining all the reducers to form a single source of truth i.e our Root Reducer will make it easier for the store to know everything about the application.
Let’s now design our Reducers. To make things more easier for you, I would like to mention one interesting bit which will help us design them in a more convenient way:
Reducer will be just a replica of what we designed earlier in our state tree.
So, let’s have a look at how our headerReducer from Image will look like:
// Header Reducer
const headerReducer = combineReducer({
menu: menuReducer,
search: searchReducer,
location: locationReducer
});
[ Note: A rule of thumb to design the reducer in a correct way would be to broke it into some smaller reducers, as each of them would represent individual identities that are responsible for their specific operations. This helps us to enforce better separation of concerns in our eCommerce app ]
Step#3 : Implement Actions
Now that we have learned how to design our reducers the correct way, let’s now learn how to implement Actions which will make sure we make correct calls to our API:
Each and every typical action that serves API calls in an app would go through three defined stages:
- Loading state -> FETCH_SEARCH_DATA
- Success -> FETCH_SEARCH_SUCCESS
- Failure -> FETCH_SEARCH_FAILURE
A recommended method to apply to our eCommerce app is to define and maintain these three actions so as to check the correct data flow from the API.
Here’s a typical example of these actions that calls the search API of our eCommerce app:
export function fetchSearchData(args) {
return async (dispatch) => {
// Initiate loading state
dispatch({
type: FETCH_SEARCH_DATA
});
try {
// Call the API
const result = await fetchSearchData(args.pageCount, args.itemsPerPage);

// Update payload in reducer on success
dispatch({
type: FETCH_SEARCH_SUCCESS,
payload: result,
currentPage: args.pageCount
});
} catch (err) {
// Update error in reducer on failure
dispatch({
type: FETCH_SEARCH_FAILURE,
error: err
});
}
};
}
Step #4 : Integrating React with Redux store using React-Redux
At the beginning of the article, I mentioned how well React pairs with Redux to develop an eCommerce web application. Now is the time for us to integrate React with Redux which we can do seamlessly by using react-redux package.
Using Provider class to let our app know of Redux store
In order to integrate React with Redux store, we first have to let our app know that this store exists. This is where the Provider-class of react-redux package comes handy. One interesting bit to be note down for Provider class of react-redux package is that it can only makes the store accessible to its children.
Since, we would ideally want our entire eCommerce app to access the Redux store, it’ll be a great idea to put our App component within Provider class.
// src/index.js // //
…
import React from 'react';
import ReactDOM from 'react-dom';
import { Provider } from 'react-redux';
const App = <h1>React-Redux eCommerce app</h1>;
ReactDOM.render(
<Provider store={store}>
{ App }
</Provider> ,
document.getElementById('root')
);
Now that we’ve completed the initial part of the React-Redux integration i.e using the Provider class, now is the time for us to connect React components with the Redux store we created earlier.
Using Connect component to link React components with Redux store
We established previously that there is no way to directly interact with the store. We can either retrieve data by obtaining its current state, or change its state by dispatching an action (we only have access to the top and bottom component of the Redux flow diagram shown previously).
This is precisely what connect component does. Consider this piece of code, which uses connect to map the stores state and dispatch to the props of a component named SearchData to fetch search data:
import React, { Component } from 'react';
import { connect } from 'react-redux'
import fetchSearchData from './action/fetchSearchData';
import SearchData from './SearchData';
const Search = (props) => (
<SearchData
search={props.search}
fetchSearchData={props.fetchSearchData}
/>
);
const mapStateToProps = (state) => ({
search: state.header.search.payload
});
const mapDispatchToProps = {
fetchSearchData
};
export default connect(mapStateToProps, mapDispatchToProps)(Search)
In the above code snippets, mapStateToProps and mapDispatchToProps are both pure functions that are provided the stores “state” and “dispatch” respectively.
The connected component (which is exported) provides fetchSearchData as props to Search component.
It’s important to note that only components within the Provider can be connected.
The following image will give you a definite explanation of the working of connect component.
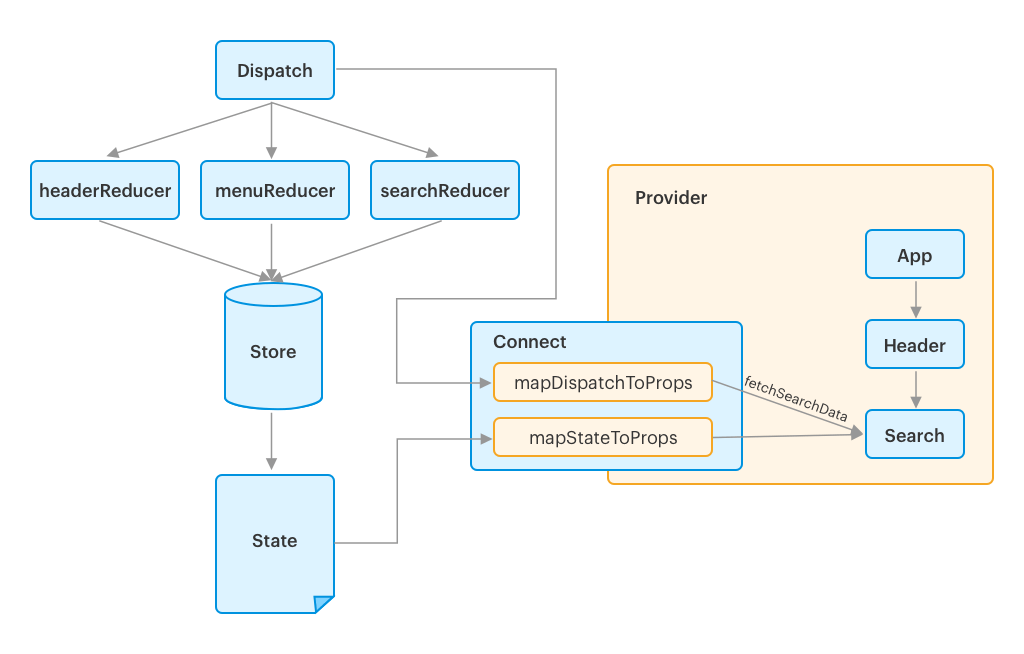
[ Note: It should be note that only components within the Provider class can be connected using Connect ]
Now, we have learned how to connect our React components to Redux.
Until here, we have learned how to make a React eCommerce application frontend. But what about Backend?
How can we make sensitive API calls?
How about handling and validating form submissions?
Well, this is where we need to setup an API using Express or a framework like Feathers. The API will provide our application with access to a database service such as MongoDB. I will suggest you to go through the tutorial (in the link) to setup the same.
After doing all these, you can make your app up and going.
Summing Up
As you can see, developing an eCommerce app is much easier with a framework like React and a tiny library such as Redux. I will be covering more tutorials on React regarding Server side rendering (SSR) and Progressive Web App in my upcoming blogs, so make sure to sign-up so as to read it earlier.