Introduction
Azure Static Web Apps is a service that automatically builds and deploys full stack web apps to Azure from a GitHub repository.
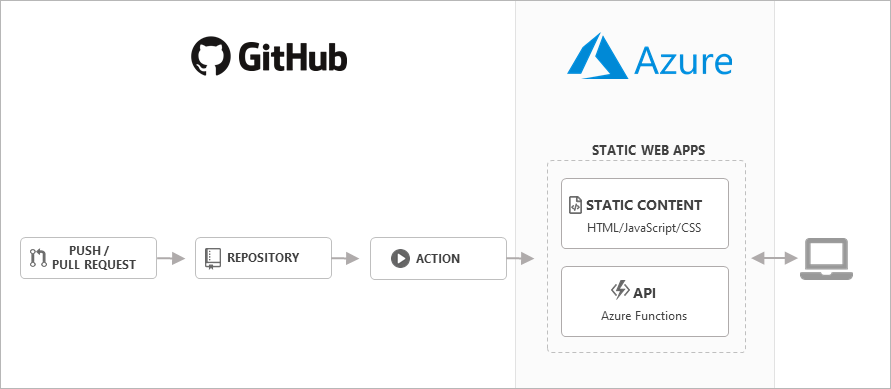
The workflow of Azure Static Web Apps is tailored to a developer’s daily workflow. Apps are built and deployed based off GitHub interactions.
When you create an Azure Static Web Apps resource, Azure sets up a GitHub Actions workflow in the app’s source code repository that monitors a branch of your choice. Every time you push commits or accept pull requests into the watched branch, the GitHub Action automatically builds and deploys your app and its API to Azure.
Static web apps are commonly built using libraries and frameworks like Angular, React, Svelte, Vue, or Blazor. These apps include HTML, CSS, JavaScript, and image assets that make up the application. With a traditional web server, these assets are served from a single server alongside any required API endpoints.
With Static Web Apps, static assets are separated from a traditional web server and are instead served from points geographically distributed around the world.
This distribution makes serving files much faster as files are physically closer to end users. In addition, API endpoints are hosted using a serverless architecture, which avoids the need for a full back-end server all together.
Key features
- Web hosting for static content like HTML, CSS, JavaScript, and images.
- Integrated API support provided by Azure Functions. First-class GitHub integration where repository changes trigger builds and deployments.
- Globally distributed static content, putting content closer to your users.
- Free SSL certificates, which are automatically renewed.
- Custom domains to provide branded customizations to your app.
- Seamless security model with a reverse-proxy when calling APIs, which requires no CORS configuration.
- Authentication provider integrations with Azure Active Directory, Facebook, Google, GitHub, and Twitter.
- Customizable authorization role definition and assignments.
- Back-end routing rules enabling full control over the content and routes you serve.
- Generated staging versions powered by pull requests enabling preview versions of your site before publishing.
What you can do with Static Web Apps
- Build modern web applications with JavaScript frameworks and libraries like Angular, React, Svelte, Vue, or using Blazor to create WebAssembly applications, with an Azure Functions back-end.
- Publish static sites with frameworks like Gatsby, Hugo, VuePress.
- Deploy web applications with frameworks like Next.js and Nuxt.js.
Building your first static web app
Azure Static Web Apps publishes a website to a production environment by building apps from a GitHub repository. In this quickstart, you deploy a web application to Azure Static Web apps using the Visual Studio Code extension.
If you don’t have an Azure subscription, create a free trial account.
Prerequisites
- GitHub account
- Azure account
- Visual Studio Code
- Azure Static Web Apps extension for Visual Studio Code
Create a repository
This article uses a GitHub template repository to make it easy for you to get started. The template features a starter app used to deploy using Azure Static Web Apps.
- Make sure you’re signed in to GitHub and navigate to the following location to create a new repository:
- a. https://github.com/staticwebdev/vanilla-basic/generate
- Name your repository my-first-static-web-app
Note:Azure Static Web Apps requires at least one HTML file to create a web app. The repository you create in this step includes a single index.html file.
Select Create repository from template.

Clone the repository
With the repository created in your GitHub account, clone the project to your local machine using the following command.
git clone https://github.com/<YOUR_GITHUB_ACCOUNT_NAME>/my-first-static-web-app.git
Make sure to replace
Next, open Visual Studio Code and go to File > Open Folder to open the repository you just cloned to your machine in the editor.
Create a static web app
-
Inside Visual Studio Code, select the Azure logo in the Activity Bar to open the Azure extensions window.

Note: Azure and GitHub sign in are required. If you are not already signed in to Azure and GitHub from Visual Studio Code, the extension will prompt you to sign in to both during the creation process.
- Place your mouse over the Static Web Apps label and select the plus sign.

- The command palate opens at the top of the editor and prompts you to name your application. Type my-first-static-web-app and press Enter.

- Select the master branch and press Enter.

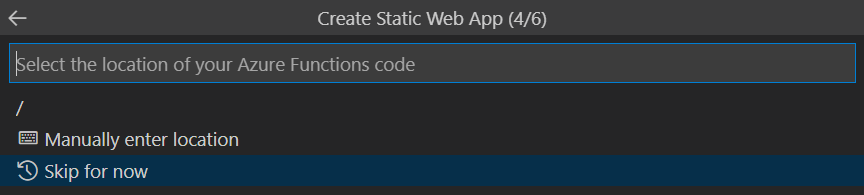
- Select / as the location for the application code and press Enter.

- The extension is looking for the location of the API in your application. This article doesn’t implement an API. Select Skip for now and press Enter.
-
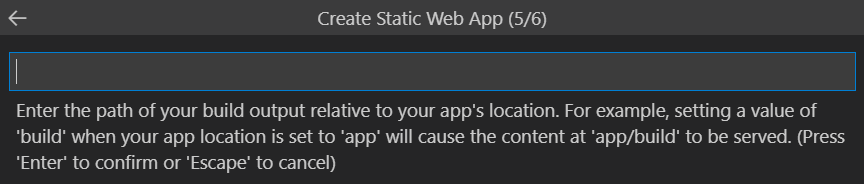
Select the location where files are built for production in your app
Clear the box and press Enter.
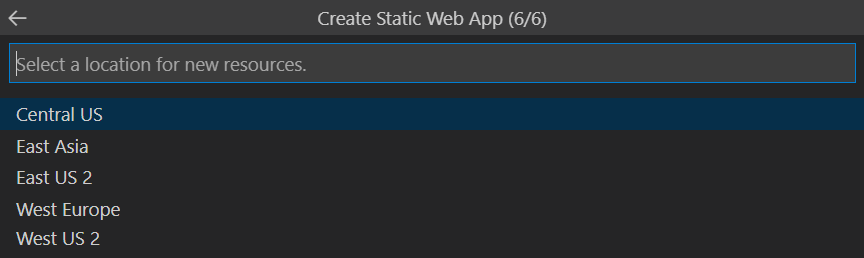
- Select a location nearest you and press Enter.
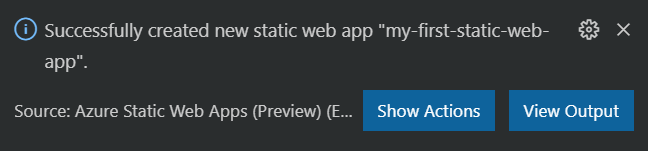
9.Once the app is created, a confirmation notification is shown in Visual Studio Code.
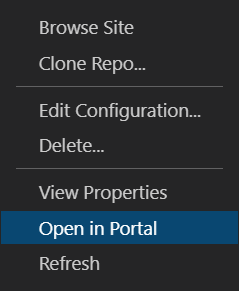
- In the Visual Studio Code Explorer window, return to the Static Web Apps section and right-click on Production and select Open in Portal to view app in the Azure portal.
View the website
There are two aspects to deploying a static app. The first provisions the underlying Azure resources that make up your app. The second is a GitHub Actions workflow that builds and publishes your application.
Before you can navigate to your new static site, the deployment build must first finish running.
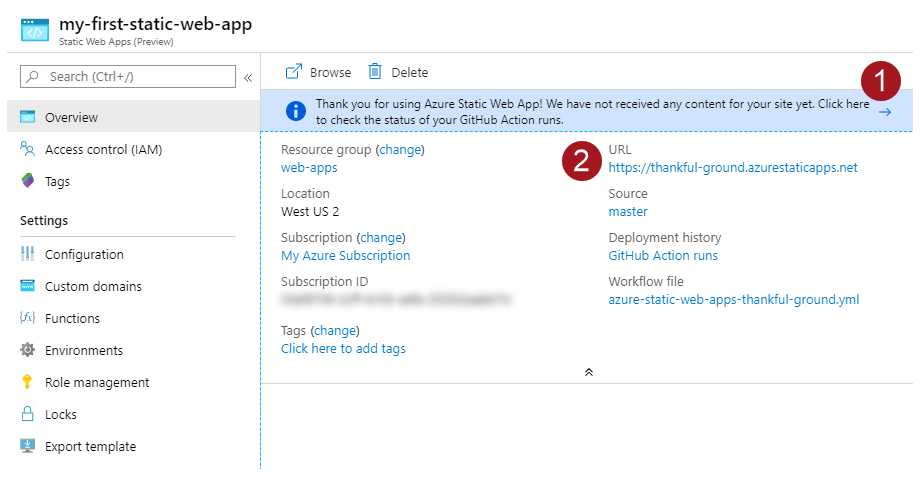
The Static Web Apps overview window displays a series of links that help you interact with your web app.
-
Clicking on the banner that says, Click here to check the status of your GitHub Actions runs takes you to the GitHub Actions running against your repository. Once you verify the deployment job is complete, then you can navigate to your website via the generated URL.
-
Once GitHub Actions workflow is complete, you can click on the URL link to open the website in new tab.
Clean up resources
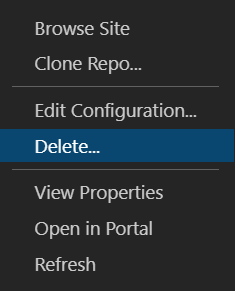
If you’re not going to continue to use this application, you can delete the Azure Static Web Apps instance through the extension.
In the Visual Studio Code Explorer window, return to the Static Web Apps section and right-click on my-first-static-web-app and select Delete.
Add an API to Azure Static Web Apps Preview with Azure Functions
You can add serverless APIs to Azure Static Web Apps via integration with Azure Functions. This article demonstrates how to add and deploy an API to an Azure Static Web Apps site.
Prerequisites
- Azure account with an active subscription. If you don’t have an account, you can create one for free.
- Visual Studio Code
- Azure Functions extension for Visual Studio Code
- Live Server Visual Studio Code extension.
- Node.js to run the API app locally
Create a Git repository
The following steps demonstrate how to create a new repository and clone the files to your computer.
-
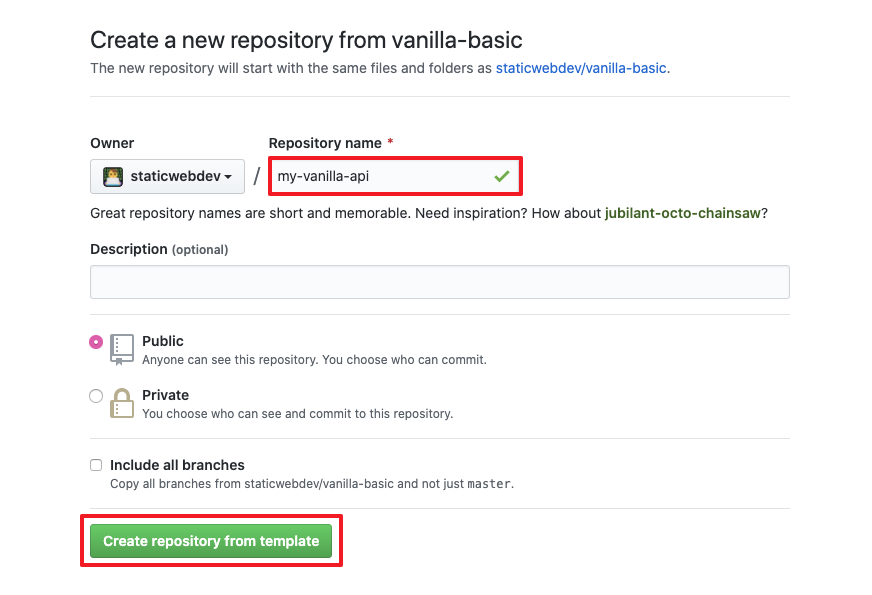
Make sure you are logged in to GitHub and, navigate to https://github.com/staticwebdev/vanilla-basic/generate to create a new repository.
-
In the Repository name box, enter my-vanilla-api.
-
Click Create repository from template.
Once your project is created, copy the URL in your browser for the new repository. You use this URL in Visual Studio Code to clone the Git repository.
-
Press F1 to open command in the Command Palette.
-
Paste the URL into the Git: Clone prompt, and press Enter.

Follow the prompts to select a repository location to clone the project.
Create the API
Next, you create an Azure Functions project as the application’s API.
-
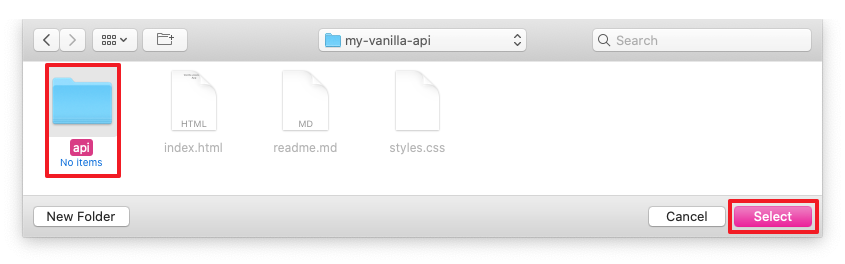
Inside the my-vanilla-api project, create a sub-folder named api.
-
Press F1 to open the Command Palette
-
Type Azure Functions: Create New Project…
-
Press Enter
-
Choose Browse
-
Select the api folder as the directory for your project workspace
-
Choose Select
- Provide the following information at the prompts:
- Select a language: Choose JavaScript
- Select a template for your project’s first function: Choose HTTP trigger
- Provide a function name: Enter GetMessage
- Authorization level: Choose Anonymous, which enables anyone to call your function endpoint.
- To learn about authorization levels, see Authorization keys.
Visual Studio Code generates an Azure Functions project with an HTTP triggered function.
Your app now has a project structure similar to the following example.
├── api
│   ├── GetMessage
│   │   ├── function.json
│   │   ├── index.js
│   │   └── sample.dat
│   ├── host.json
│   ├── local.settings.json
│   ├── package.json
│   └── proxies.json
├── index.html
├── readme.md
└── styles.css
Next, you’ll change the GetMessage function to return a message to the front-end.
- Update the GetMessage function under api/GetMessage/index.js with the following code.
``` java script
module.exports = async function (context, req) { context.res = { body: { text: “Hello from the API” } }; };
2. Update the GetMessage configuration under api/GetMessage/function.json with the following settings.
{ “bindings”: [ { “authLevel”: “anonymous”, “type”: “httpTrigger”, “direction”: “in”, “name”: “req”, “methods”: [ “get” ], “route”: “message” }, { “type”: “http”, “direction”: “out”, “name”: “res” } ] }
With the above settings, the API endpoint is:
* Triggered when an HTTP request is made to the function
* Available to all requests regardless of authentication status
* Exposed via the /api/message route
## Run the API locally
Visual Studio Code integrates with Azure Functions Core Tools to let you run this project on your local development computer before you publish to Azure.
>Tip:
Make sure you have all the resources listed in the prerequisites section installed before proceeding.
1. Run the function by pressing F5 to start the Functions app.
2. If Azure Functions Core Tools isn't already *installed*, select **Install** at the prompt. The Core Tools shows output from the running application in the Terminal panel. As a part of the output, you can see the URL endpoint of your HTTP-triggered function running locally.
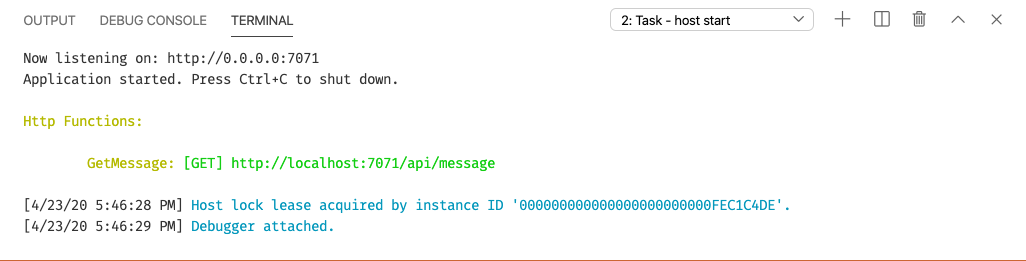
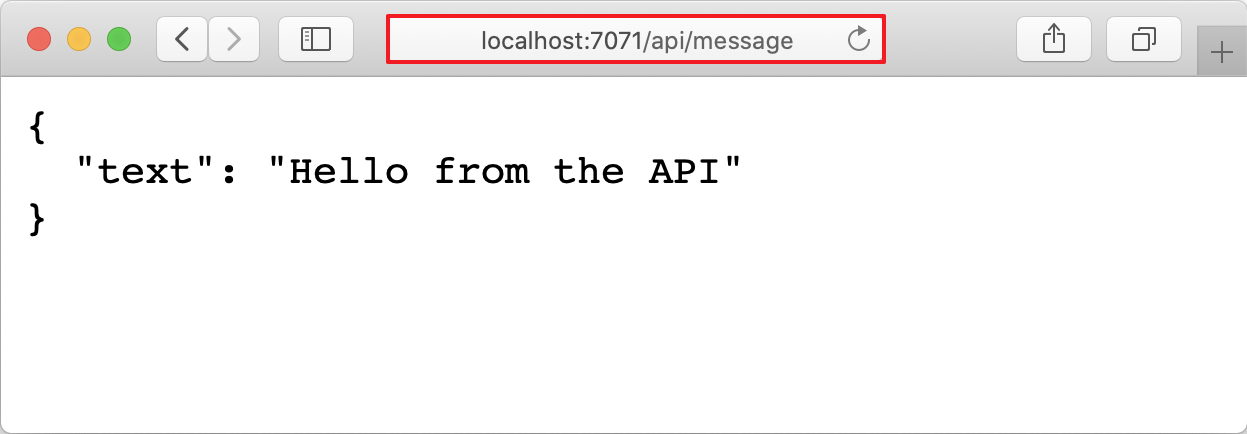
3. With Core Tools running, navigate to the following URL to verify the API is running correctly: http://localhost:7071/api/message.
The response in the browser should look similar to the following example:
4. Press Shift + F5 to stop the debugging session.
## Call the API from the application
When deployed to Azure, requests to the API are automatically routed to the Functions app for requests sent to the api route. Working locally, you have to configure the application settings to proxy requests to the local API.
## Local proxy
You can configure a proxy for the Live Server Visual Studio Code extension that routes all requests to /api to the running API endpoint at http://127.0.0.1:7071/api.
1. Open the .vscode/settings.json file.
2. Add the following settings to specify a proxy for Live Server.
```json
"liveServer.settings.proxy": {
"enable": true,
"baseUri": "/api",
"proxyUri": "http://127.0.0.1:7071/api"
}
This configuration is best saved in project settings file, as opposed to in the user settings file.
Using project settings assures the proxy isn’t applied to all other projects opened in Visual Studio Code.
Update HTML files to access the API
- Next, update the content of the index.html file with the following code to fetch the text from the API function and display it on the screen:
<!DOCTYPE html>
<html lang="en">

<head>
  <meta charset="UTF-8">
  <meta name="viewport" content="width=device-width, initial-scale=1.0">
  <link rel="stylesheet" href="styles.css">
  <title>Vanilla JavaScript App</title>
</head>

<body>
  <main>
    <h1>Vanilla JavaScript App</h1>
    <p>Loading content from the API: <b id="name">...</b></p>
  </main>

  <script>
    (async function() {
      let { text } = await( await fetch(`/api/message`)).json();
      document.querySelector('#name').textContent = text;
    }())
  </script>
</body>

</html>
-
Press F5 to start the API project.
-
Press F1 and choose Live Server: Open with Live Server.
You should now see the API message in the web page.

Note:You can use other HTTP servers or proxies to serve the index.html file. Accessing the index.html from file:/// will not work.
- Press Shift + F5 to stop the API project.
Commit and push your changes to GitHub
Using Visual Studio Code, commit and push your changes to the remote git repository.
- Press F1 to open the Command Palette
- Type Git: Commit All
- Add a commit message and press Enter
- Press F1
- Type in Git: push and press Enter
Create a static web app
- Navigate to the Azure portal
- Click Create a Resource
- Search for Static Web App
- Click Static Web App (Preview)
- Click Create
Next, add the app-specific settings.
- Select your Azure subscription
- Select or create a new Resource Group
- Name the app my-vanilla-api.
- Select Region closest to you
- Select the Free SKU
- Click the Sign-in with GitHub button and authenticate with GitHub
- Select your preferred Organization
- Select my-vanilla-api from the Repository drop-down
- Select master from the Branch drop-down
- Click the Next: Build > button to edit the build configuration
Next, add the following the build details.
-
Enter / for the App location.
-
Enter api in the Api location box.
-
Clear the default value out of the App artifact location, leaving the box empty.
-
Click Review + create.
-
Click the Create button
Once you click the Create button, Azure does two things. First, the underlying cloud services are created to support the app. Next, a background process begins to build and deploy the application.
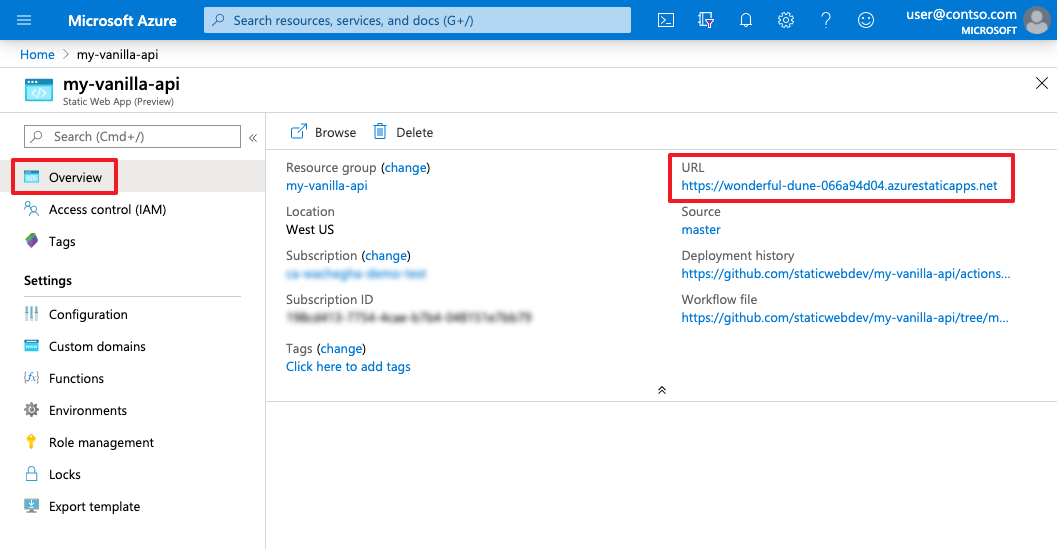
- Click the Go to Resource button to take you to the web app’s Overview page.
As the app is being built in the background, you can click on the banner which contains a link to view the build status.
Clean up resources
If you don’t want to keep this application for further use, you can use the following steps to delete the Azure Static Web App and its related resources.
- Navigate to the Azure portal
- In the top search bar, type Resource groups
- Click Resource groups
- Select myResourceGroup
- On the myResourceGroup page, make sure that the listed resources are the ones you want to delete.
- Select Delete
- Type myResourceGroup in the text box
- Select Delete.