Create an Azure AD B2C tenant
Before your applications can interact with Azure Active Directory B2C (Azure AD B2C), they must be registered in a tenant that you manage.
In this article, you learn how to:
- Create an Azure AD B2C tenant
- Link your tenant to your subscription
- Switch to the directory containing your Azure AD B2C tenant
- Add the Azure AD B2C resource as a Favorite in the Azure portal
Prerequisites
If you don’t have an Azure subscription, create a free account before you begin.
Create an Azure AD B2C tenant
-
Sign in to the Azure portal. Sign in with an Azure account that’s been assigned at least the Contributor role within the subscription or a resource group within the subscription.
-
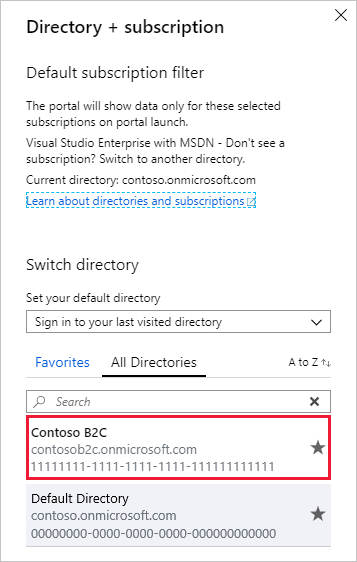
Select the directory that contains your subscription.
In the Azure portal toolbar, select the Directory + Subscription icon, and then select the directory that contains your subscription. This directory is different from the one that will contain your Azure AD B2C tenant.

-
On the Azure portal menu or from the Home page, select Create a resource.
-
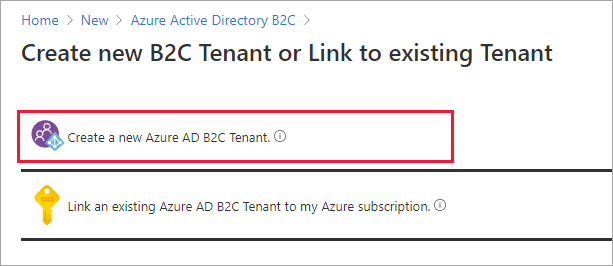
Search for Azure Active Directory B2C, and then select Create.
-
Select Create a new Azure AD B2C Tenant.
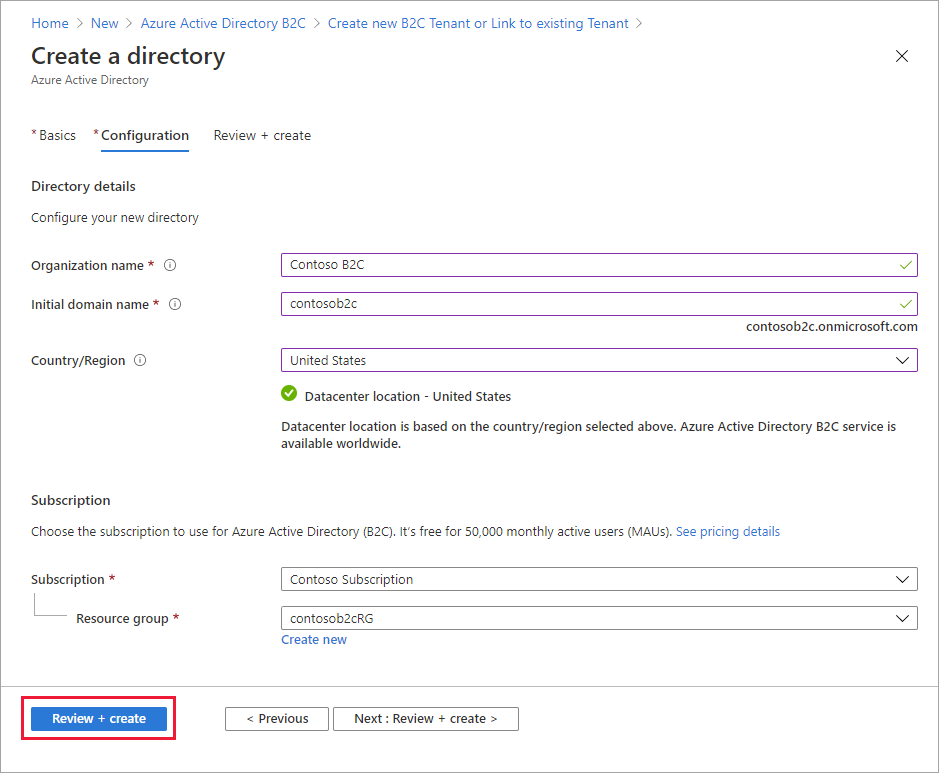
- On the Create a directory page, enter the following:
- Organization name - Enter a name for your Azure AD B2C tenant.
- Initial domain name - Enter a domain name for your Azure AD B2C tenant.
- Country or region - Select your country or region from the list. This selection can’t be changed later.
- Subscription - Select your subscription from the list.
- Resource group - Select a resource group that will contain the tenant. Or select Create new, enter a Name for the resource group, select the Resource group location, and then select OK.
-
Select Review + create.
-
Review your directory settings. Then select Create.
You can link multiple Azure AD B2C tenants to a single Azure subscription for billing purposes. To link a tenant, you must be an admin in the Azure AD B2C tenant and be assigned at least a Contributor role within the Azure subscription.
Select your B2C tenant directory
To start using your new Azure AD B2C tenant, you need to switch to the directory that contains the tenant.
Select the Directory + subscription filter in the top menu of the Azure portal, then select the directory that contains your Azure AD B2C tenant.
If at first you don’t see your new Azure B2C tenant in the list, refresh your browser window, then select the Directory + subscription filter again in the top menu.
Add Azure AD B2C as a favorite (optional)
This optional step makes it easier to select your Azure AD B2C tenant in the following and all subsequent tutorials.
Instead of searching for Azure AD B2C in All services every time you want to work with your tenant, you can instead favorite the resource. Then, you can select it from the portal menu’s Favorites section to quickly browse to your Azure AD B2C tenant.
You only need to perform this operation once. Before performing these steps, make sure you’ve switched to the directory containing your Azure AD B2C tenant as described in the previous section, Select your B2C tenant directory.
-
Sign in to the Azure portal.
-
In the Azure portal menu, select All services.
-
In the All services search box, search for Azure AD B2C, hover over the search result, and then select the star icon in the tooltip. Azure AD B2C now appears in the Azure portal under Favorites.
-
If you want to change the position of your new favorite, go to the Azure portal menu, select Azure AD B2C, and then drag it up or down to the desired position.

Next steps
In this article, you learned how to:
- Create an Azure AD B2C tenant
- Link your tenant to your subscription
- Switch to the directory containing your Azure AD B2C tenant
- Add the Azure AD B2C resource as a Favorite in the Azure portal
- Next, learn how to register a web application in your new tenant.