Angular 10 Material Datatable Inline HttpClient CRUD Operations using RestFull APIs
In this Angular tutorial, we’ll learn how to use HttpClient module in Angular application to make RESTFull API Ajax calls.
We’ll set up a new Angular 10 project and create API endpoints to perform Create, Read, Update and Delete operations using HTTP methods using a mock server using the **json-server** package. Using **json-server** we can create a local JSON file which can act as a database for our application. There is no difference between a local mock server and a real database.
We’ll perform HTTP operation using API endpoints to add, edit, delete and get list of items listed in an Angular Material Datatable.
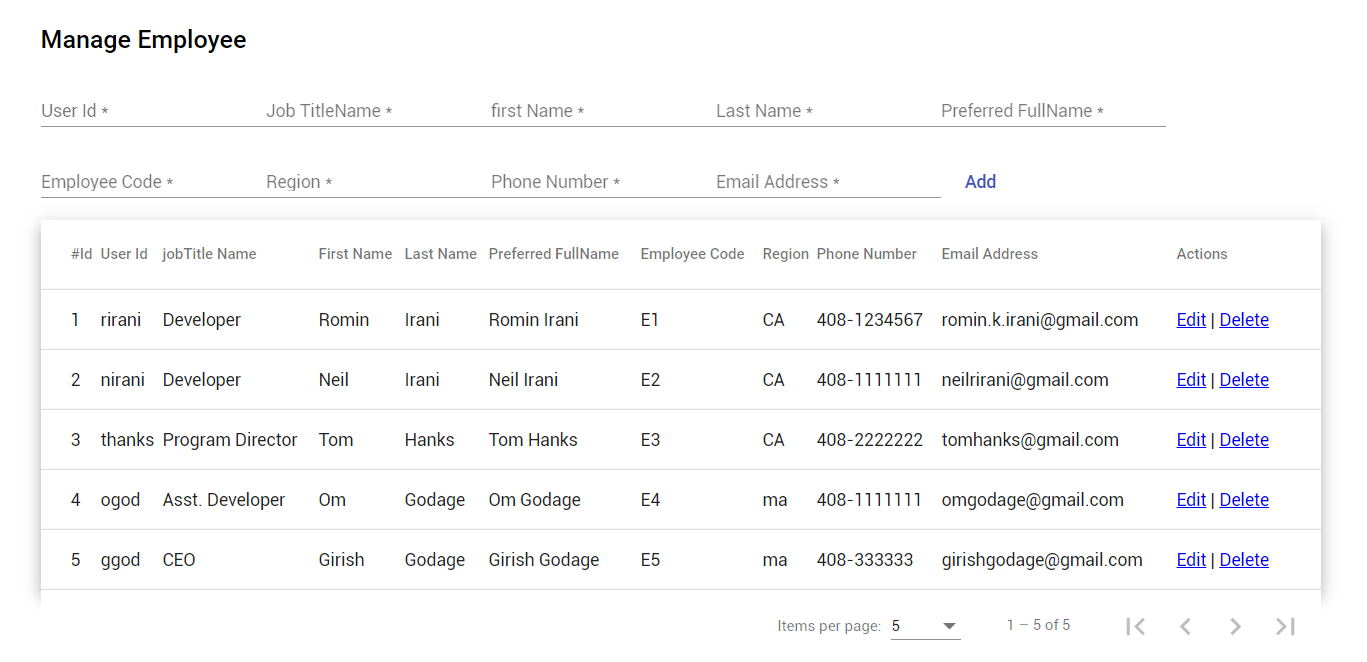
This Material Datatable will have action column using which user an Edit or Delete a row. There will be a form over the table to Add or Update existing rows in
After implementation, our application will look like this
First, let’s have a look at Angular HttpClient and its features.
What is Angular HttpClient?
A reactive application like Angular, communicate with server databases to fetch data in form of JSON object using Ajax API calls.
These API Ajex calls use XMLHttpRequest service for old browsers or fetch() methods under the hood.
The HttpClient service provided by Angular’s **@angular/common/http** package provides a simple interface to make HTTP calls with many optimized and efficient browser support features.
Moreover, we can also use RxJS based Observables and operators to handle client-side or server-side errors.
Using Interceptors service we can modify requests and responses of API calls and even cancels them.
Let’s get started!
#Setup Angular CLI
Angular CLI is the most prefered and official way for creating a new Angular project.
Make sure you have installed the latest version on Angular CLI tool on your system.
Run following npm command to install
$ npm install -g @angular/cli
For this tutorial, we have installed v10.1.6
#Create a new Angular 10 project
Next, create a new Angular project by running following ng command in the terminal
$ ng new ang-datatable-app
On hitting above command, ng CLI will ask few configurational questions
? Would you like to add Angular routing? Yes
? Which stylesheet format would you like to use? CSS
Now move to the project folder
$ cd ang-datatable-app
Run the project by executing below command
$ ng serve --open
As we have created the Angular project successfully, lets mover further to create a dummy mock JSON server.
#Setup a Mock JSON Server
For testing and learning HttpClient module, we need to test Http methods, which will communicate to the server by calling Rest APIs.
These RESTFull APIs return JSON data which is then consumed by Angular application. This API JSON data may come from any third-party API, Server Database or any local server database.
Here we will create a dummy mock JSON API server using the **json-server** package. using this package we can create a mock server using which we can perform all HTTP methods like **GET**, **POST**, **PUT**, **PATCH** and **DELETE**.
First, install the **json-server** package by running bellow npm command in the terminal window:
$ npm install -g json-server
After that create a new folder API in the project root and place JSON file data.json at ~ang-datatable-app/API/data.json
The data.json file will work as RESTfull server. We will add some dummy employeess data. So that will act like a database on which we will perform CRUD operations.
#Start JSON Server
To start the JSON server using json-server, run following command in a new terminal:<
$ json-server --watch ./API/data.json
Now you can access our mock server at http://localhost:3000/employees
Following are the API URLs available on our server:
- GET /employees - fetch all employees
- GET /employees/: id - fetch a single employee detail by id
- POST /employees - create a new employee
- PUT /employees/: id - update a employee by id
- PATCH /employees/: id - partially update a employee by id
- DELETE /employees/:id - delete a employee by id
As we are ready with our server, next we will import HttpClientModule in Angular project to use HTTP services.
Configure HttpClient in Angular 10 project
Before using HTTP services, we need to import **HttpClientModule** from **@angular/common/http** class.
Now open the app.module.ts file, then make the following changes:
// app.module.ts

import { BrowserModule } from '@angular/platform-browser';
import { NgModule } from '@angular/core';

import { AppRoutingModule } from './app-routing.module';
import { AppComponent } from './app.component';

import { HttpClientModule } from '@angular/common/http';

@NgModule({
  declarations: [
    AppComponent
  ],
  imports: [
    BrowserModule,
    AppRoutingModule,
    HttpClientModule
  ],
  providers: [],
  bootstrap: [AppComponent]
})
export class AppModule { }
We will add Angular Material Datatable to perform CRUD operations on Employees data. So let us install and configure Material UI library in our project.
#Install and Setup Angular Material
Angular Material is a UI library which provides several easy to use feature components. In this tutorial, we will use Material Datatables to show employees records and perform the various inline operation on employees records.
Run following npm command in terminal to install Material library and answer some configuration answers.
$ ng add @angular/material


? Choose a prebuilt theme name, or "custom" for a custom theme: Indigo/Pink        [ Preview: https://material.angular.io?theme=indigo-pink ]
? Set up global Angular Material typography styles? Yes
? Set up browser animations for Angular Material? Yes
To use Material UI components, we need to import modules of components which we are going to use in the application’s module so that these will be available in our class components to use.
As we will be using Material Datatables with pagination, so we need to import **MatTableModule** and **MatPaginatorModule**.
To update and add employees rows we will add Material Form as well, for that we will also import **FormsModule**,**ReactiveFormsModule**, **MatInputModule**, and **MatButtonModule** as well
in the app.module.ts file as shown below:
// app.module.ts

import { BrowserModule } from '@angular/platform-browser';
import { NgModule } from '@angular/core';

import { AppRoutingModule } from './app-routing.module';
import { AppComponent } from './app.component';

import { HttpClientModule } from '@angular/common/http';
import { BrowserAnimationsModule } from '@angular/platform-browser/animations';

import { FormsModule, ReactiveFormsModule } from '@angular/forms';

import { MatTableModule } from '@angular/material/table';
import { MatPaginatorModule } from '@angular/material/paginator';
import { MatInputModule } from '@angular/material/input';
import { MatButtonModule } from '@angular/material/button';


@NgModule({
  declarations: [
    AppComponent
  ],
  imports: [
    BrowserModule,
    AppRoutingModule,
    HttpClientModule,
    BrowserAnimationsModule,
    FormsModule,
    ReactiveFormsModule,

    // Material Modules
    MatTableModule,
    MatPaginatorModule,
    MatInputModule,
    MatButtonModule
  ],
  providers: [],
  bootstrap: [AppComponent]
})
export class AppModule { }
#Creating a Service to Communicate Server through HTTP methods
Now we’ll create a new service to separate all HTTP methods which will communicate to server and do CRUD operations.
Let’s create a new serve HttpDataService under services folder by running following ng command in the terminal window:
$ ng generate service services/http-data
Above **generate** command will create the **HttpDataService** for us at this location ~src/app/services/http-data.service.ts
Also, create an Interface class for Employees data by running following command defining the type of values for employee item.
$ ng generate class models/Employee
then replace the following content in the newly created file “~/models/employee.ts”
export class Employee {
    id: number;
    userId: string;
    jobTitleName: string;
    firstName: string;
    lastName: string;
    preferredFullName: string;
    employeeCode: string;
    region: string
    phoneNumber: string;
    emailAddress: string;
}
Our service will be going to play an important role in maintaining a connection with the server. Let us dive deep into this file and check what it will have?
Add the server API URL for end-points and define in the **base_path** variable. This is the path which opens up on running our **json-server**
  // API path
  base_path = 'http://localhost:3000/employees';
Note: Make sure your server is still running.
We’ll import these three classes
**HttpClient** : This class provides HTTP methods like **get()**, **post()**, **put()** and **delete()**.
**HttpHeaders**: For setting request headers in HTTP calls we use this class.
  // Http Options
  httpOptions = {
    headers: new HttpHeaders({
      'Content-Type': 'application/json'
    })
  }
**HttpErrorResponse**: Used to efficiently handle errors from client-side or server-side.
  // Handle API errors
  handleError(error: HttpErrorResponse) {
    if (error.error instanceof ErrorEvent) {
      // A client-side or network error occurred. Handle it accordingly.
      console.error('An error occurred:', error.error.message);
    } else {
      // The backend returned an unsuccessful response code.
      // The response body may contain clues as to what went wrong,
      console.error(
        `Backend returned code ${error.status}, ` +
        `body was: ${error.error}`);
    }
    // return an observable with a user-facing error message
    return throwError(
      'Something bad happened; please try again later.');
  };
#RxJs functions and operators to the rescue</span>
</h4>
The RxJs library provides many useful function and operator which we will use in our service:
**Observables**: Observables are used to perform asynchronous tasks like HTTP calls. We can subscribe them to get success or error response. They provide several other features file cancellations and continuous event retrieval, unlike promises.
**throwError**: This method is used to intentionally throw an error with a message when an HTTP request fails.
**retry()**: The retry operator is used to make HTTP call again for the number of times specified when a call fails due to network server issues.
**catchError()**: This method catches the error and throws to errorHandler
#Defining CRUD Methods
Now we will add the methods to do CRUD operation on emloyees data in our mock server which we created using **json-server**.
Create an Employee
The new employee will be created using the **post()** method
  // Create a new item
  createItem(item): Observable<Employee> {
    return this.http
      .post<Employee>(this.base_path, JSON.stringify(item), this.httpOptions)
      .pipe(
        retry(2),
        catchError(this.handleError)
      )
  }
The **createItem()** method is accepting **item** attribute with employee details to add.
Retrieve Employee Details
To fetch single employee details we use **get()** method with employee **id** whose detail needs to be checked.
 // Get single employee data by ID
  getItem(id): Observable<Employee> {
    return this.http
      .get<Employee>(this.base_path + '/' + id)
      .pipe(
        retry(2),
        catchError(this.handleError)
      )
  }
Retrieve All Employees
Similarly, we will make **get** call to fetch all employees list
  // Get employees data
  getList(): Observable<Employee> {
    return this.http
      .get<Employee>(this.base_path)
      .pipe(
        retry(2),
        catchError(this.handleError)
      )
  }
Update single employee
The **put()** method will update single employee with id passed
  // Update item by id
  updateItem(id, item): Observable<Employee> {
    return this.http
      .put<Employee>(this.base_path + '/' + id, JSON.stringify(item), this.httpOptions)
      .pipe(
        retry(2),
        catchError(this.handleError)
      )
  }
Delete a single employee
The **delete()** HTTP method will delete a single record whose id is passed
  // Delete item by id
  deleteItem(id) {
    return this.http
      .delete<Employee>(this.base_path + '/' + id, this.httpOptions)
      .pipe(
        retry(2),
        catchError(this.handleError)
      )
  }
After combining all explained code the final http-data.service.ts file will look like this:
// http-data.servie.ts
import { Injectable } from '@angular/core';
import { HttpClient, HttpHeaders, HttpErrorResponse } from '@angular/common/http';
import { Employee } from '../models/employee';
import { Observable, throwError } from 'rxjs';
import { retry, catchError } from 'rxjs/operators';

@Injectable({
  providedIn: 'root'
})
export class HttpDataService {


  // API path
  base_path = 'http://localhost:3000/employees';

  constructor(private http: HttpClient) { }

  // Http Options
  httpOptions = {
    headers: new HttpHeaders({
      'Content-Type': 'application/json'
    })
  }

  // Handle API errors
  handleError(error: HttpErrorResponse) {
    if (error.error instanceof ErrorEvent) {
      // A client-side or network error occurred. Handle it accordingly.
      console.error('An error occurred:', error.error.message);
    } else {
      // The backend returned an unsuccessful response code.
      // The response body may contain clues as to what went wrong,
      console.error(
        `Backend returned code ${error.status}, ` +
        `body was: ${error.error}`);
    }
    // return an observable with a user-facing error message
    return throwError(
      'Something bad happened; please try again later.');
  };


  // Create a new item
  createItem(item): Observable<Employee> {
    return this.http
      .post<Employee>(this.base_path, JSON.stringify(item), this.httpOptions)
      .pipe(
        retry(2),
        catchError(this.handleError)
      )
  }

  // Get single employee data by ID
  getItem(id): Observable<Employee> {
    return this.http
      .get<Employee>(this.base_path + '/' + id)
      .pipe(
        retry(2),
        catchError(this.handleError)
      )
  }

  // Get employees data
  getList(): Observable<Employee> {
    return this.http
      .get<Employee>(this.base_path)
      .pipe(
        retry(2),
        catchError(this.handleError)
      )
  }

  // Update item by id
  updateItem(id, item): Observable<Employee> {
    return this.http
      .put<Employee>(this.base_path + '/' + id, JSON.stringify(item), this.httpOptions)
      .pipe(
        retry(2),
        catchError(this.handleError)
      )
  }

  // Delete item by id
  deleteItem(id) {
    return this.http
      .delete<Employee>(this.base_path + '/' + id, this.httpOptions)
      .pipe(
        retry(2),
        catchError(this.handleError)
      )
  }
}
#Create new pages
To show employees data in a table, we will create a new employees component and update the app-routing.module.ts file to open /employees page on application load.
Create the **EmployeesComponent**
by running below generate command:
$ ng generate component pages/employees
Setup the App Routing Module Now update the app-routing.module.tsfile with below code.
// app-routing.module.ts
import { NgModule } from '@angular/core';
import { Routes, RouterModule } from '@angular/router';
import { EmployeesComponent } from './pages/employees/employees.component';


const routes: Routes = [
  {
    path: '',
    redirectTo: '/employees',
    pathMatch: 'full'
  },
  {
    path: 'employees',
    component: EmployeesComponent
  }
];

@NgModule({
  imports: [RouterModule.forRoot(routes)],
  exports: [RouterModule]
})
export class AppRoutingModule { }
#Using HttpDataService in Employees Page
As we defined our HttpDataService as **providedIn: 'root'**so we can directly use it in our Angular application. This will share a single instance across the application.
To use service methods in our employee’s page at ~src/app/pages/employees/employees.component.ts, we need to **impor**t it and then add in component the contractor() method as shown below:
...
import { HttpDataService } from 'src/app/services/http-data.service';

@Component({
  selector: 'app-employees',
  templateUrl: './employees.component.html',
  styleUrls: ['./employees.component.css']
})
export class EmployeesComponent implements OnInit {

  constructor(private httpDataService: HttpDataService) { }

  ...
}
#Adding Angular Material Datatable
Next, we will add a Datatable with Employees columns and an extra Actions column where we will do inline Edit, Delete and Update operations.
For creating the Material datatable, the **mat-table** directive is used. We are also adding pagination by appending the **mat-paginator** directive just after ending **</table>** tag.
Update the employees.component.html file with below code to build a Material datatable:
        <!-- Form to edit/add row -->

        <table mat-table [dataSource]="dataSource" class="mat-elevation-z8">

    <ng-container matColumnDef="id">
        <th mat-header-cell *matHeaderCellDef> #Id </th>
        <td mat-cell *matCellDef="let element">  </td>
    </ng-container>

    <ng-container matColumnDef="userId">
        <th mat-header-cell *matHeaderCellDef> User Id </th>
        <td mat-cell *matCellDef="let element">  </td>
    </ng-container>

    <ng-container matColumnDef="jobTitleName">
        <th mat-header-cell *matHeaderCellDef> jobTitle Name </th>
        <td mat-cell *matCellDef="let element">  </td>
    </ng-container>

    <ng-container matColumnDef="firstName">
        <th mat-header-cell *matHeaderCellDef> First Name </th>
        <td mat-cell *matCellDef="let element">  </td>
    </ng-container>

    <ng-container matColumnDef="lastName">
        <th mat-header-cell *matHeaderCellDef> Last Name </th>
        <td mat-cell *matCellDef="let element">  </td>
    </ng-container>

    <ng-container matColumnDef="preferredFullName">
        <th mat-header-cell *matHeaderCellDef> Preferred FullName </th>
        <td mat-cell *matCellDef="let element">  </td>
    </ng-container>

    <ng-container matColumnDef="employeeCode">
        <th mat-header-cell *matHeaderCellDef> Employee Code </th>
        <td mat-cell *matCellDef="let element">  </td>
    </ng-container>

    <ng-container matColumnDef="region">
        <th mat-header-cell *matHeaderCellDef> Region </th>
        <td mat-cell *matCellDef="let element">  </td>
    </ng-container>

    <ng-container matColumnDef="phoneNumber">
        <th mat-header-cell *matHeaderCellDef> Phone Number </th>
        <td mat-cell *matCellDef="let element">  </td>
    </ng-container>

    <ng-container matColumnDef="emailAddress">
        <th mat-header-cell *matHeaderCellDef> Email Address </th>
        <td mat-cell *matCellDef="let element">  </td>
    </ng-container>

    <ng-container matColumnDef="actions">
        <th mat-header-cell *matHeaderCellDef> Actions </th>
        <td mat-cell *matCellDef="let element">
            <a href="javascript:void(0)" (click)="editItem(element)">Edit</a> |
            <a href="javascript:void(0)" (click)="deleteItem(element.id)">Delete</a>
        </td>
    </ng-container>

    <tr mat-header-row *matHeaderRowDef="displayedColumns"></tr>
    <tr mat-row *matRowDef="let row; columns: displayedColumns;"
        [ngClass]="{'editable-row': employeeData.id === row.id}"></tr>
</table>
<mat-paginator [pageSize]="5" [pageSizeOptions]="[5, 10, 15]" showFirstLastButtons></mat-paginator>
</div>
In the last **actions** column there are two actions to Edit with **editEmployee()** method and Delete with **deleteEmployee()** method for the row.
To add a new row or update the data in the existing row we will add a form above table.
    <form (submit)="onSubmit()" #employeeForm="ngForm">

        <mat-form-field>
            <input matInput placeholder="User Id" name="userId" required [(ngModel)]="employeeData.userId">
        </mat-form-field>
        <mat-form-field>
            <input matInput placeholder="Job TitleName" name="jobTitleName" required [(ngModel)]="employeeData.jobTitleName">
        </mat-form-field>
        <mat-form-field>
            <input matInput placeholder="first Name" name="firstName" required [(ngModel)]="employeeData.firstName">
        </mat-form-field>
        <mat-form-field>
            <input matInput placeholder="Last Name" name="lastName" required [(ngModel)]="employeeData.lastName">
        </mat-form-field>
        <mat-form-field>
            <input matInput placeholder="Preferred FullName" name="preferredFullName" required [(ngModel)]="employeeData.preferredFullName">
        </mat-form-field>
        <mat-form-field>
            <input matInput placeholder="Employee Code" name="employeeCode" required [(ngModel)]="employeeData.employeeCode">
        </mat-form-field>
        <mat-form-field>
            <input matInput placeholder="Region" name="region" required [(ngModel)]="employeeData.region">
        </mat-form-field>
        <mat-form-field>
            <input matInput placeholder="Phone Number" name="phoneNumber" required [(ngModel)]="employeeData.phoneNumber">
        </mat-form-field>
        <mat-form-field>
            <input matInput placeholder="Email Address" name="emailAddress" required [(ngModel)]="employeeData.emailAddress">
        </mat-form-field>

        <ng-container *ngIf="isEditMode; else elseTemplate">
            <button mat-button color="primary">Update</button>
            <a mat-button color="warn" (click)="cancelEdit()">Cancel</a>
        </ng-container>
        <ng-template #elseTemplate>
            <button mat-button color="primary">Add</button>
        </ng-template>

    </form>
The text in form submit button will change based on the boolean value in the **isEditMode** variable.
#Update Component Class
After adding Material datatable and Form, let us update employees.component.ts file with required methods.
First, initialize the Template driven form with the **NgForm**
  @ViewChild('employeeForm', { static: false })
  employeeForm: NgForm;
Import the Employee class which we created and define a new variable employeeData of type Employee
employeeData: Employee;
Then define the **dataSource** and **displayedColumns** with **MatPaginator** class to build our Datatable
  dataSource = new MatTableDataSource();
  displayedColumns: string[] = ['id', 'userId', 'jobTitleName', 'firstName','lastName','preferredFullName','employeeCode','region', 'phoneNumber','emailAddress','actions'];
  @ViewChild(MatPaginator, { static: true }) paginator: MatPaginator;
Then we will add methods to Add, Delete, Edit, Update and Get Employees list in the class file as shown below:
...
  getAllEmployees() {
    this.httpDataService.getList().subscribe((response: any) => {
      this.dataSource.data = response;
    });
  }

  editItem(element) {
    this.employeeData = _.cloneDeep(element);
    this.isEditMode = true;
  }

  cancelEdit() {
    this.isEditMode = false;
    this.employeeForm.resetForm();
  }

  deleteItem(id) {
    this.httpDataService.deleteItem(id).subscribe((response: any) => {

      // Approach #1 to update datatable data on local itself without fetching new data from server
      this.dataSource.data = this.dataSource.data.filter((o: Employee) => {
        return o.id !== id ? o : false;
      })

      console.log(this.dataSource.data);

      // Approach #2 to re-call getAllEmployees() to fetch updated data
      // this.getAllEmployees()
    });
  }

  addEmployee() {
    this.httpDataService.createItem(this.employeeData).subscribe((response: any) => {
      this.dataSource.data.push({ ...response })
      this.dataSource.data = this.dataSource.data.map(o => {
        return o;
      })
    });
  }

  updateEmployee() {
    this.httpDataService.updateItem(this.employeeData.id, this.employeeData).subscribe((response: any) => {

      // Approach #1 to update datatable data on local itself without fetching new data from server
      this.dataSource.data = this.dataSource.data.map((o: Employee) => {
        if (o.id === response.id) {
          o = response;
        }
        return o;
      })

      // Approach #2 to re-call getAllEmployees() to fetch updated data
      // this.getAllEmployees()

      this.cancelEdit()

    });
  }
...
We are calling HttpDataService methods to communicate with our json-server
After adding the above method the final employees.component.ts file will look like this:
// employees.component.ts
import { Component, OnInit, ViewChild } from '@angular/core';
import { NgForm } from '@angular/forms';
import { HttpDataService } from 'src/app/services/http-data.service';
import * as _ from 'lodash';
import { Employee } from 'src/app/models/employee';
import { MatPaginator } from '@angular/material/paginator';
import { MatTableDataSource } from '@angular/material/table';

@Component({
  selector: 'app-employees',
  templateUrl: './employees.component.html',
  styleUrls: ['./employees.component.css']
})
export class EmployeesComponent implements OnInit {

  @ViewChild('employeeForm', { static: false })
  employeeForm: NgForm;

  employeeData: Employee;

  dataSource = new MatTableDataSource();
  displayedColumns: string[] = ['id', 'userId', 'jobTitleName', 'firstName','lastName','preferredFullName','employeeCode','region', 'phoneNumber','emailAddress','actions'];
  @ViewChild(MatPaginator, { static: true }) paginator: MatPaginator;

  isEditMode = false;

  constructor(private httpDataService: HttpDataService) {
    this.employeeData = {} as Employee;
   }

  ngOnInit(): void {
    // Initializing Datatable pagination
    this.dataSource.paginator = this.paginator;

    // Fetch All Employees on Page load
    this.getAllEmployees();
  }

  getAllEmployees(){
    this.httpDataService.getList().subscribe((response: any) => {
      this.dataSource.data = response;
    });
  }

  editItem(element) {
    this.employeeData = _.cloneDeep(element);
    this.isEditMode = true;
  }

  cancelEdit() {
    this.isEditMode = false;
    this.employeeForm.resetForm();
  }

  deleteItem(id) {
    this.httpDataService.deleteItem(id).subscribe((response: any) => {

      // Approach #1 to update datatable data on local itself without fetching new data from server
      this.dataSource.data = this.dataSource.data.filter((o: Employee) => {
        return o.id !== id ? o : false;
      })

      console.log(this.dataSource.data);

      // Approach #2 to re-call getAllEmployees() to fetch updated data
      // this.getAllEmployees()
    });
  }

  addEmployee() {
    this.httpDataService.createItem(this.employeeData).subscribe((response: any) => {
      this.dataSource.data.push({ ...response })
      this.dataSource.data = this.dataSource.data.map(o => {
        return o;
      })
    });
  }

  updateEmployee() {
    this.httpDataService.updateItem(this.employeeData.id, this.employeeData).subscribe((response: any) => {

      // Approach #1 to update datatable data on local itself without fetching new data from server
      this.dataSource.data = this.dataSource.data.map((o: Employee) => {
        if (o.id === response.id) {
          o = response;
        }
        return o;
      })

      // Approach #2 to re-call getAllEmployees() to fetch updated data
      // this.getAllEmployees()

      this.cancelEdit()

    });
  }

  onSubmit() {
    if (this.employeeForm.form.valid) {
      if (this.isEditMode)
        this.updateEmployee()
      else
        this.addEmployee();
    } else {
      console.log('Enter valid data!');
    }
  }

}
That’s it now run you server by executing **$ json-server --watch ./API/data.json** then run Angular application in another terminal by executing **$ ng serve --open**
You can get source code of this tutorial in my GitHub repo here
Conclusion: In this tutorial, we get to know how to use Http services to make server communication, use get, post, put and delete methods on data server. We use RxJs methods and operators to handle errors and network issues using retry() . Added Angular Material UI library to show data rows in a Datatable. In the Material Datatable, we performed CRUD operation using Inline approach