Amazon Personalize - can now use 10X more item attributes to improve relevance of recommendations
Amazon Personalize is a machine learning service which enables you to personalize your website, app, ads, emails, and more, with custom machine learning models which can be created in Amazon Personalize, with no prior machine learning experience. AWS is pleased to announce that Amazon Personalize now supports ten times more item attributes for modeling in Personalize. Previously, you could use up to five item attributes while building an ML model in Amazon Personalize. This limit is now 50 attributes. You can now use more information about your items, for example, category, brand, price, duration, size, author, year of release etc., to increase the relevance of recommendations.
In this post, you learn how to add item metadata with custom attributes to Amazon Personalize and create a model using this data and user interactions. This post uses the Amazon customer reviews data for beauty products. For more information and to download this data, see Amazon Customer Reviews Dataset. We will use the history of what items the users have reviewed along with user and item metadata to generate product recommendations for them.
Pre-processing the data
To model the data in Amazon Personalize, you need to break it into the following datasets:
- Users – Contains metadata about the users
- Items – Contains metadata about the items
- Interactions – Contains interactions (for this post, reviews) and metadata about the interactions
For each respective dataset, this post uses the following attributes:
- Users – customer_id, helpful_votes, and total_votes
- Items – product_id, product_category, and product_parent
- Interactions – product_id, customer_id, review_date, and star_rating
This post does not use the other attributes available, which include marketplace, review_id, product_title, vine, verified_purchase, review_headline, and review_body.
Additionally, to conform with the keywords in Amazon Personalize, this post renames customer_id to USER_ID, product_id to ITEM_ID, and review_date to TIMESTAMP.
To download and process the data for input to Amazon Personalize, use the following Python example codes.
For the Users dataset, enter the following code:
Bash
#Downloading data
$aws s3 cp s3://amazon-reviews-pds/tsv/amazon_reviews_us_Beauty_v1_00.tsv.gz .
$gunzip amazon_reviews_us_Beauty_v1_00.tsv.gz
#Generating the user dataset
import pandas as pd
fields = ['customer_id', 'helpful_votes', 'total_votes']
df = pd.read_csv('amazon_reviews_us_Beauty_v1_00.tsv', sep='\t', usecols=fields)
df = df.rename(columns={'customer_id':'USER_ID'})
df.to_csv('User_dataset.csv', index = None, header=True)
The following screenshot shows the Users dataset. This output can be generated by
df.head()
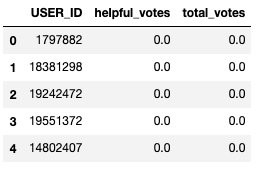
For the Items dataset, enter the following code:
#Generating the item dataset
fields = ['product_id', 'product_category', 'product_parent']
df1 = pd.read_csv('amazon_reviews_us_Beauty_v1_00.tsv', sep='\t', usecols=fields)
df1= df1.rename(columns={'product_id':'ITEM_ID'})

#Clip category names to 999 characters to confirm to Personalize limits
maxlen = 999
for index, row in df1.iterrows():
    product_category = row['product_category'][:maxlen]
    df1.set_value(index, 'product_category', product_category)
df1.to_csv('Item_dataset.csv', index = None, header=True)
The following screenshot shows the Items dataset. This output can be generated by
df.head()
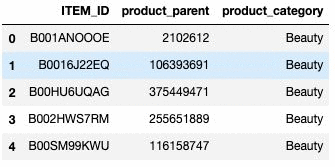
#Generating the interactions dataset
from datetime import datetime
fields = ['product_id', 'customer_id', 'review_date', 'star_rating']
df2 = pd.read_csv('amazon_reviews_us_Beauty_v1_00.tsv', sep='\t', usecols=fields, low_memory=False)
df2= df2.rename(columns={'product_id':'ITEM_ID', 'customer_id':'USER_ID', 'review_date':'TIMESTAMP'})

#Converting timstamp to UNIX timestamp and rounding milliseconds
num_errors =0
for index, row in df2.iterrows():
    time_input= row["TIMESTAMP"]
    try:
        time_input = datetime.strptime(time_input, "%Y-%m-%d")
        timestamp = round(datetime.timestamp(time_input))
        df2.set_value(index, "TIMESTAMP", timestamp)
    except:
        print("exception at index: {}".format(index))
        num_errors += 1
print("Total rows in error: {}".format(num_errors))
df2.to_csv("Interaction_dataset.csv", index = None, header=True)
The following screenshot shows the Items dataset. This output can be generated by
df.head()
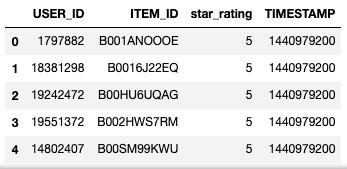
Ingesting the data
After you process the preceding data, you can ingest it in Amazon Personalize.
Creating a dataset group
To create a dataset group to store events (user interactions) sent by your application and the metadata for users and items, complete the following steps:
- On the Amazon Personalize console, under Dataset groups, choose Create dataset group.
- For Dataset group name, enter the name of your dataset group. This post enters the name DemoLimitIncrease.
- Choose Next.
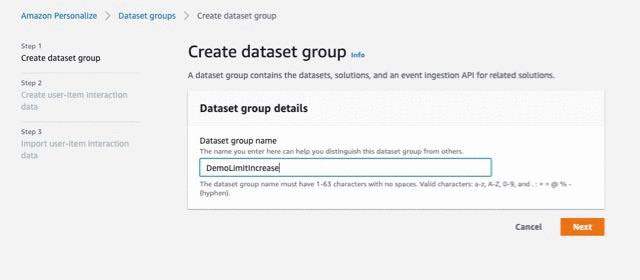
Creating a dataset and defining schema
After you create the dataset group, create a dataset and define schema for each of them. The following steps are for your Items dataset:
- For Dataset name, enter a name.
- Under Schema details, select Create new schema.
- For New schema name, enter a name.
- For Schema definition, enter the following code:
{
    "type": "record",
    "name": "Items",
    "namespace": "com.amazonaws.personalize.schema",
    "fields": [
        {
            "name": "ITEM_ID",
            "type": "string"
        },
        {
            "name": "product_parent",
            "type": "string",
            "categorical": true
        },
        {
            "name": "product_category",
            "type": "string",
            "categorical": true
        }
    ],
    "version": "1.0"}
-
Choose Next.
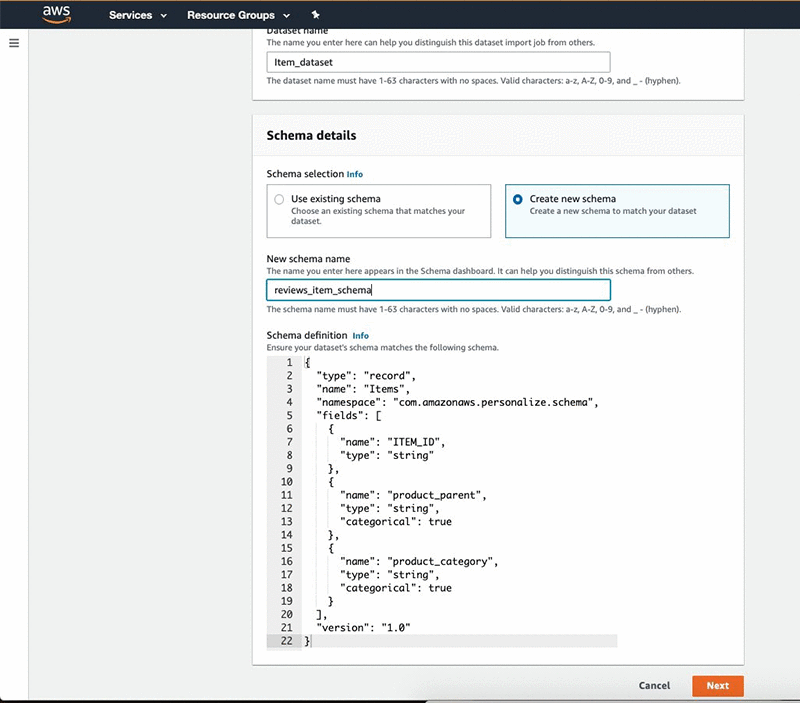
Follow the same steps for the Users and Interactions datasets and define the schema to conform to the columns you want to import.
Importing the data
After you create the dataset, import the data from Amazon S3. Make sure you provide Amazon Personalize read access to your bucket. To import your Items data, complete the following steps:
- Under Dataset import job details, for Dataset import job name, enter a name.
- For IAM Service role, choose AmazonPersonalize-ExecutionRole.
- For Data location, enter the location of your S3 bucket.
- Choose Create dataset import job.
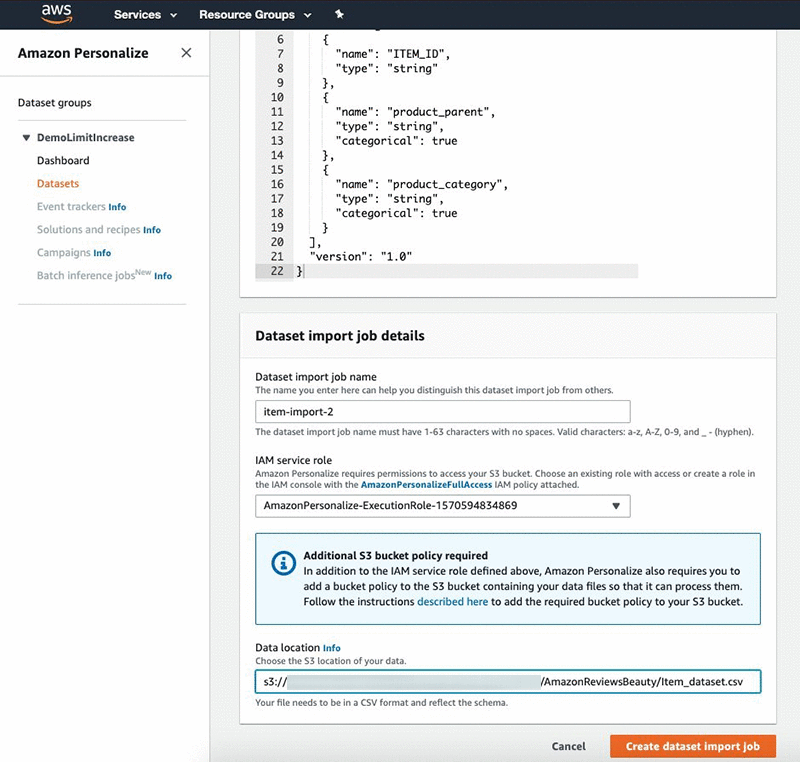
Follow the same steps to import your Users and Interactions datasets.
Training a model
After you ingest the data into Amazon Personalize, you are ready to train a model (solutionVersion). To do so, map the recipe (algorithm) you want to use to your use case. The following are your available options:
- For user personalization, such as recommending items to a user, use one of the following recipes:
- HRNN – Trains only on interaction data and provides a baseline
- HRNN-Metadata – Trains on interaction+user, item, and interaction metadata and is recommended when you have such data available
- HRNN-Coldstart – Use when you want to recommend cold (new) items to a user
- For recommending items similar to an input item, use SIMS.
- For reranking a list of input items for a given user, use Personalized-Ranking.
This post uses the HRNN-Metadata recipe to define a solution and then train a solutionVersion (model). Complete the following steps:
- On the Amazon Personalize console, under Dataset groups, choose DemoLimitIncrease.
- Choose Solutions.
- Choose Create solution.
- Under Solution configuration, for Solution name, enter a name
- For Recipe selection, select Manual.
- For Recipe, choose aws-hrnn-metadata.
- Choose Next.
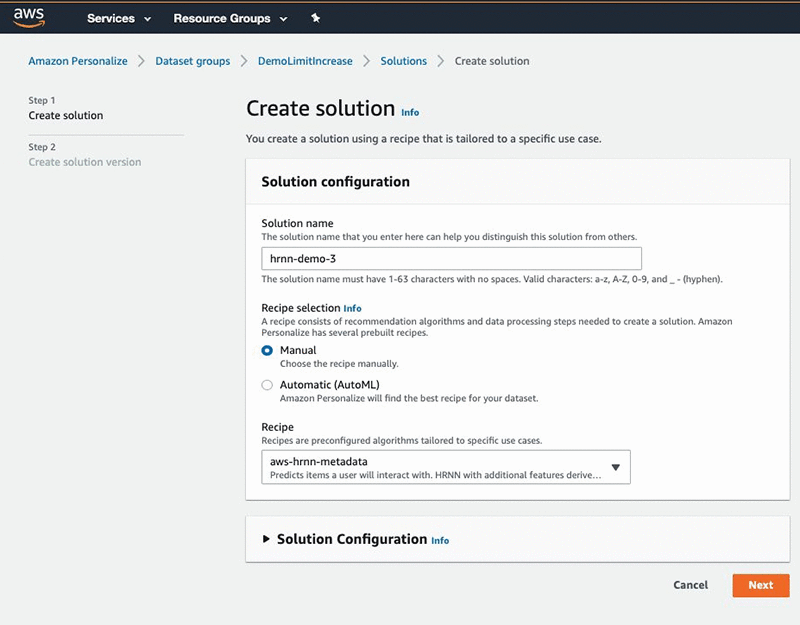
You can also change the default hyperparameters or perform hyperparameter optimization for a solution.
Getting recommendations
To get recommendations, create a campaign using the solution and solution version you just created. Complete the following steps:
- Under Dataset groups, under DemoLimitIncrease, choose Campaigns.
- Choose Create new campaign.
- Under Campaign details, for Campaign name, enter a name
- For Solution, choose the solution name from previous step.
- For Solution version ID, choose the solution version you just created.
- For Minimum provisioned transactions per second, enter 1.
- Choose Create campaign.
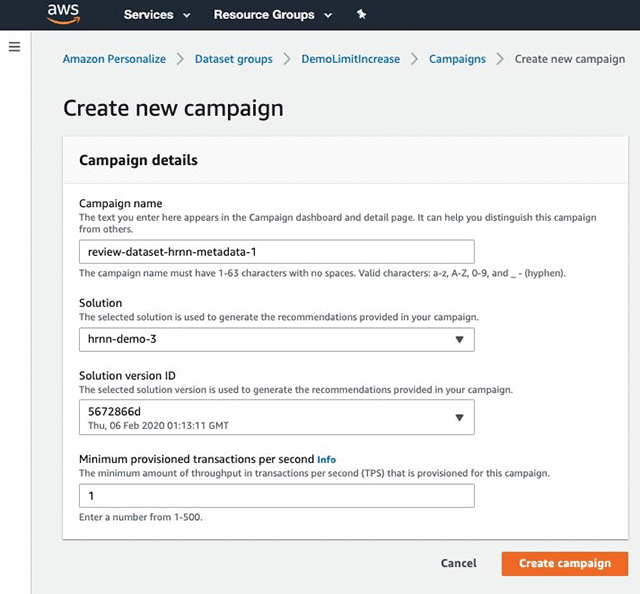
- After the campaign is created you can see the details in the console and use it to get recommendations.
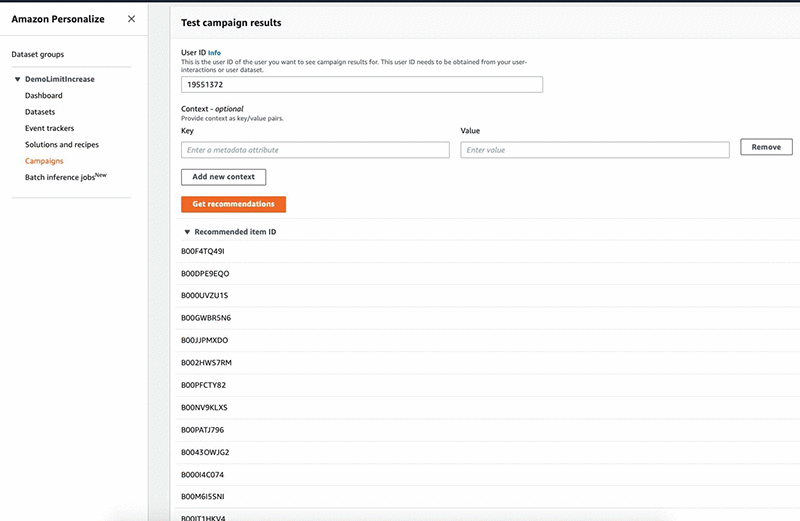
After you set up the campaign, you can programmatically call the campaign to get recommendations in form of item IDs. You can also use the console to get the recommendations and perform spot checks. Additionally, Amazon Personalize offers the ability to batch process recommendations. For more information, see Now available: Batch Recommendations in Amazon Personalize.
Conclusion
You can now use these recommendations to power display experiences, such as personalize the homepage of your beauty website based on what you know about the user or send a promotional email with recommendations. Performing real-time recommendations with Amazon Personalize requires you to also send user events as they occur. For more information, see Amazon Personalize is Now Generally Available. Get started with Amazon Personalize today!
